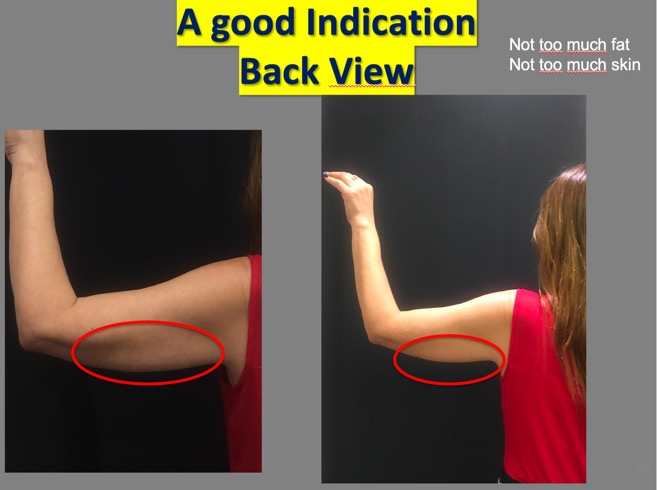
Step 1 :Taking pictures of the patient after selection of a good indication
always patient standing in an upright position
-back view
-front view
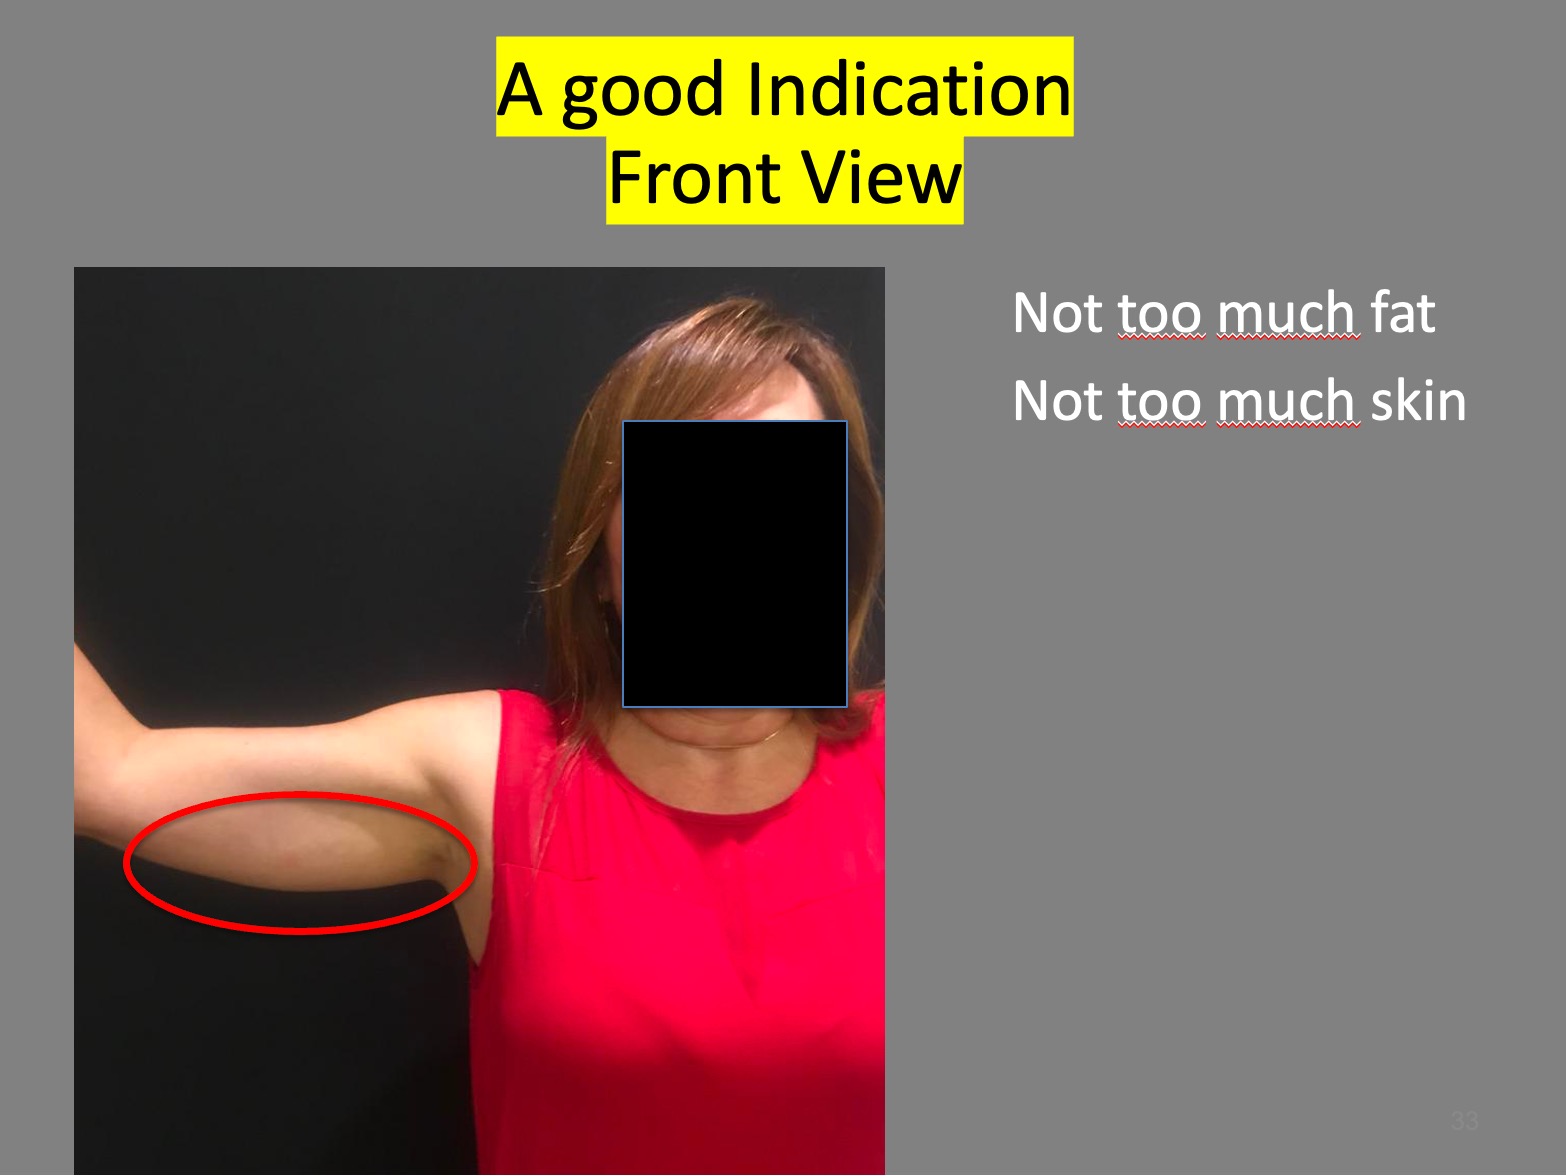
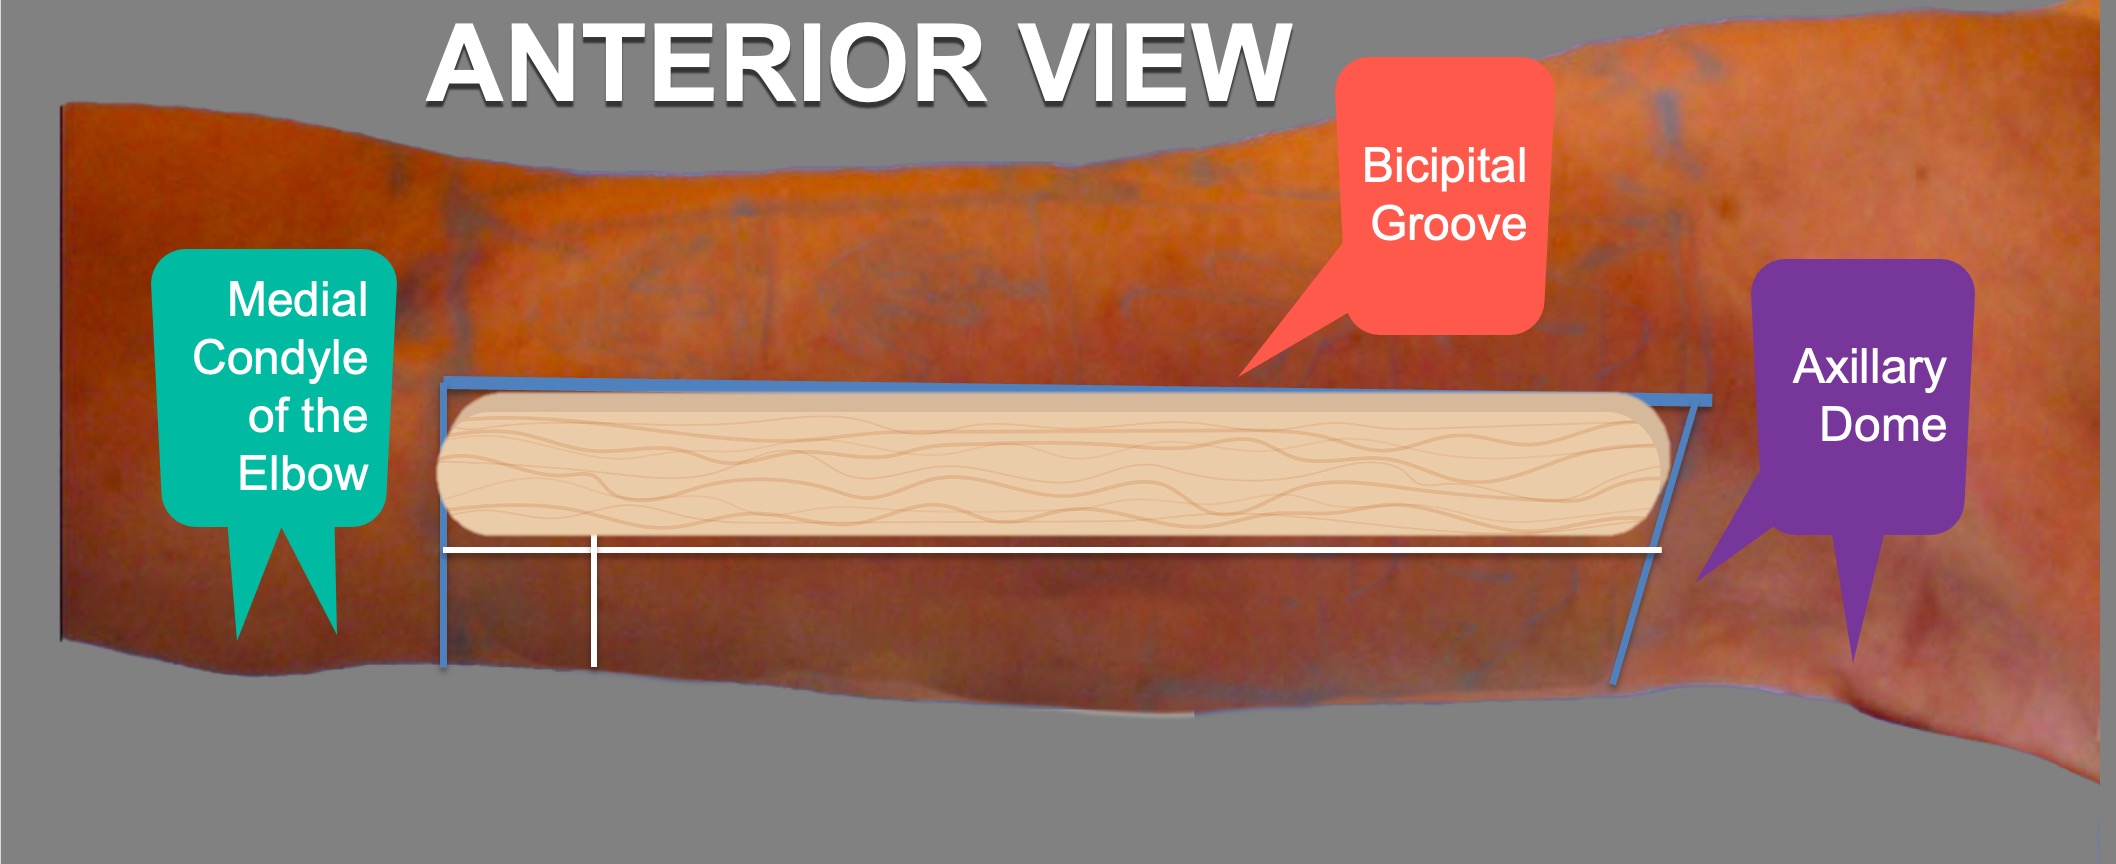
The Anterior View
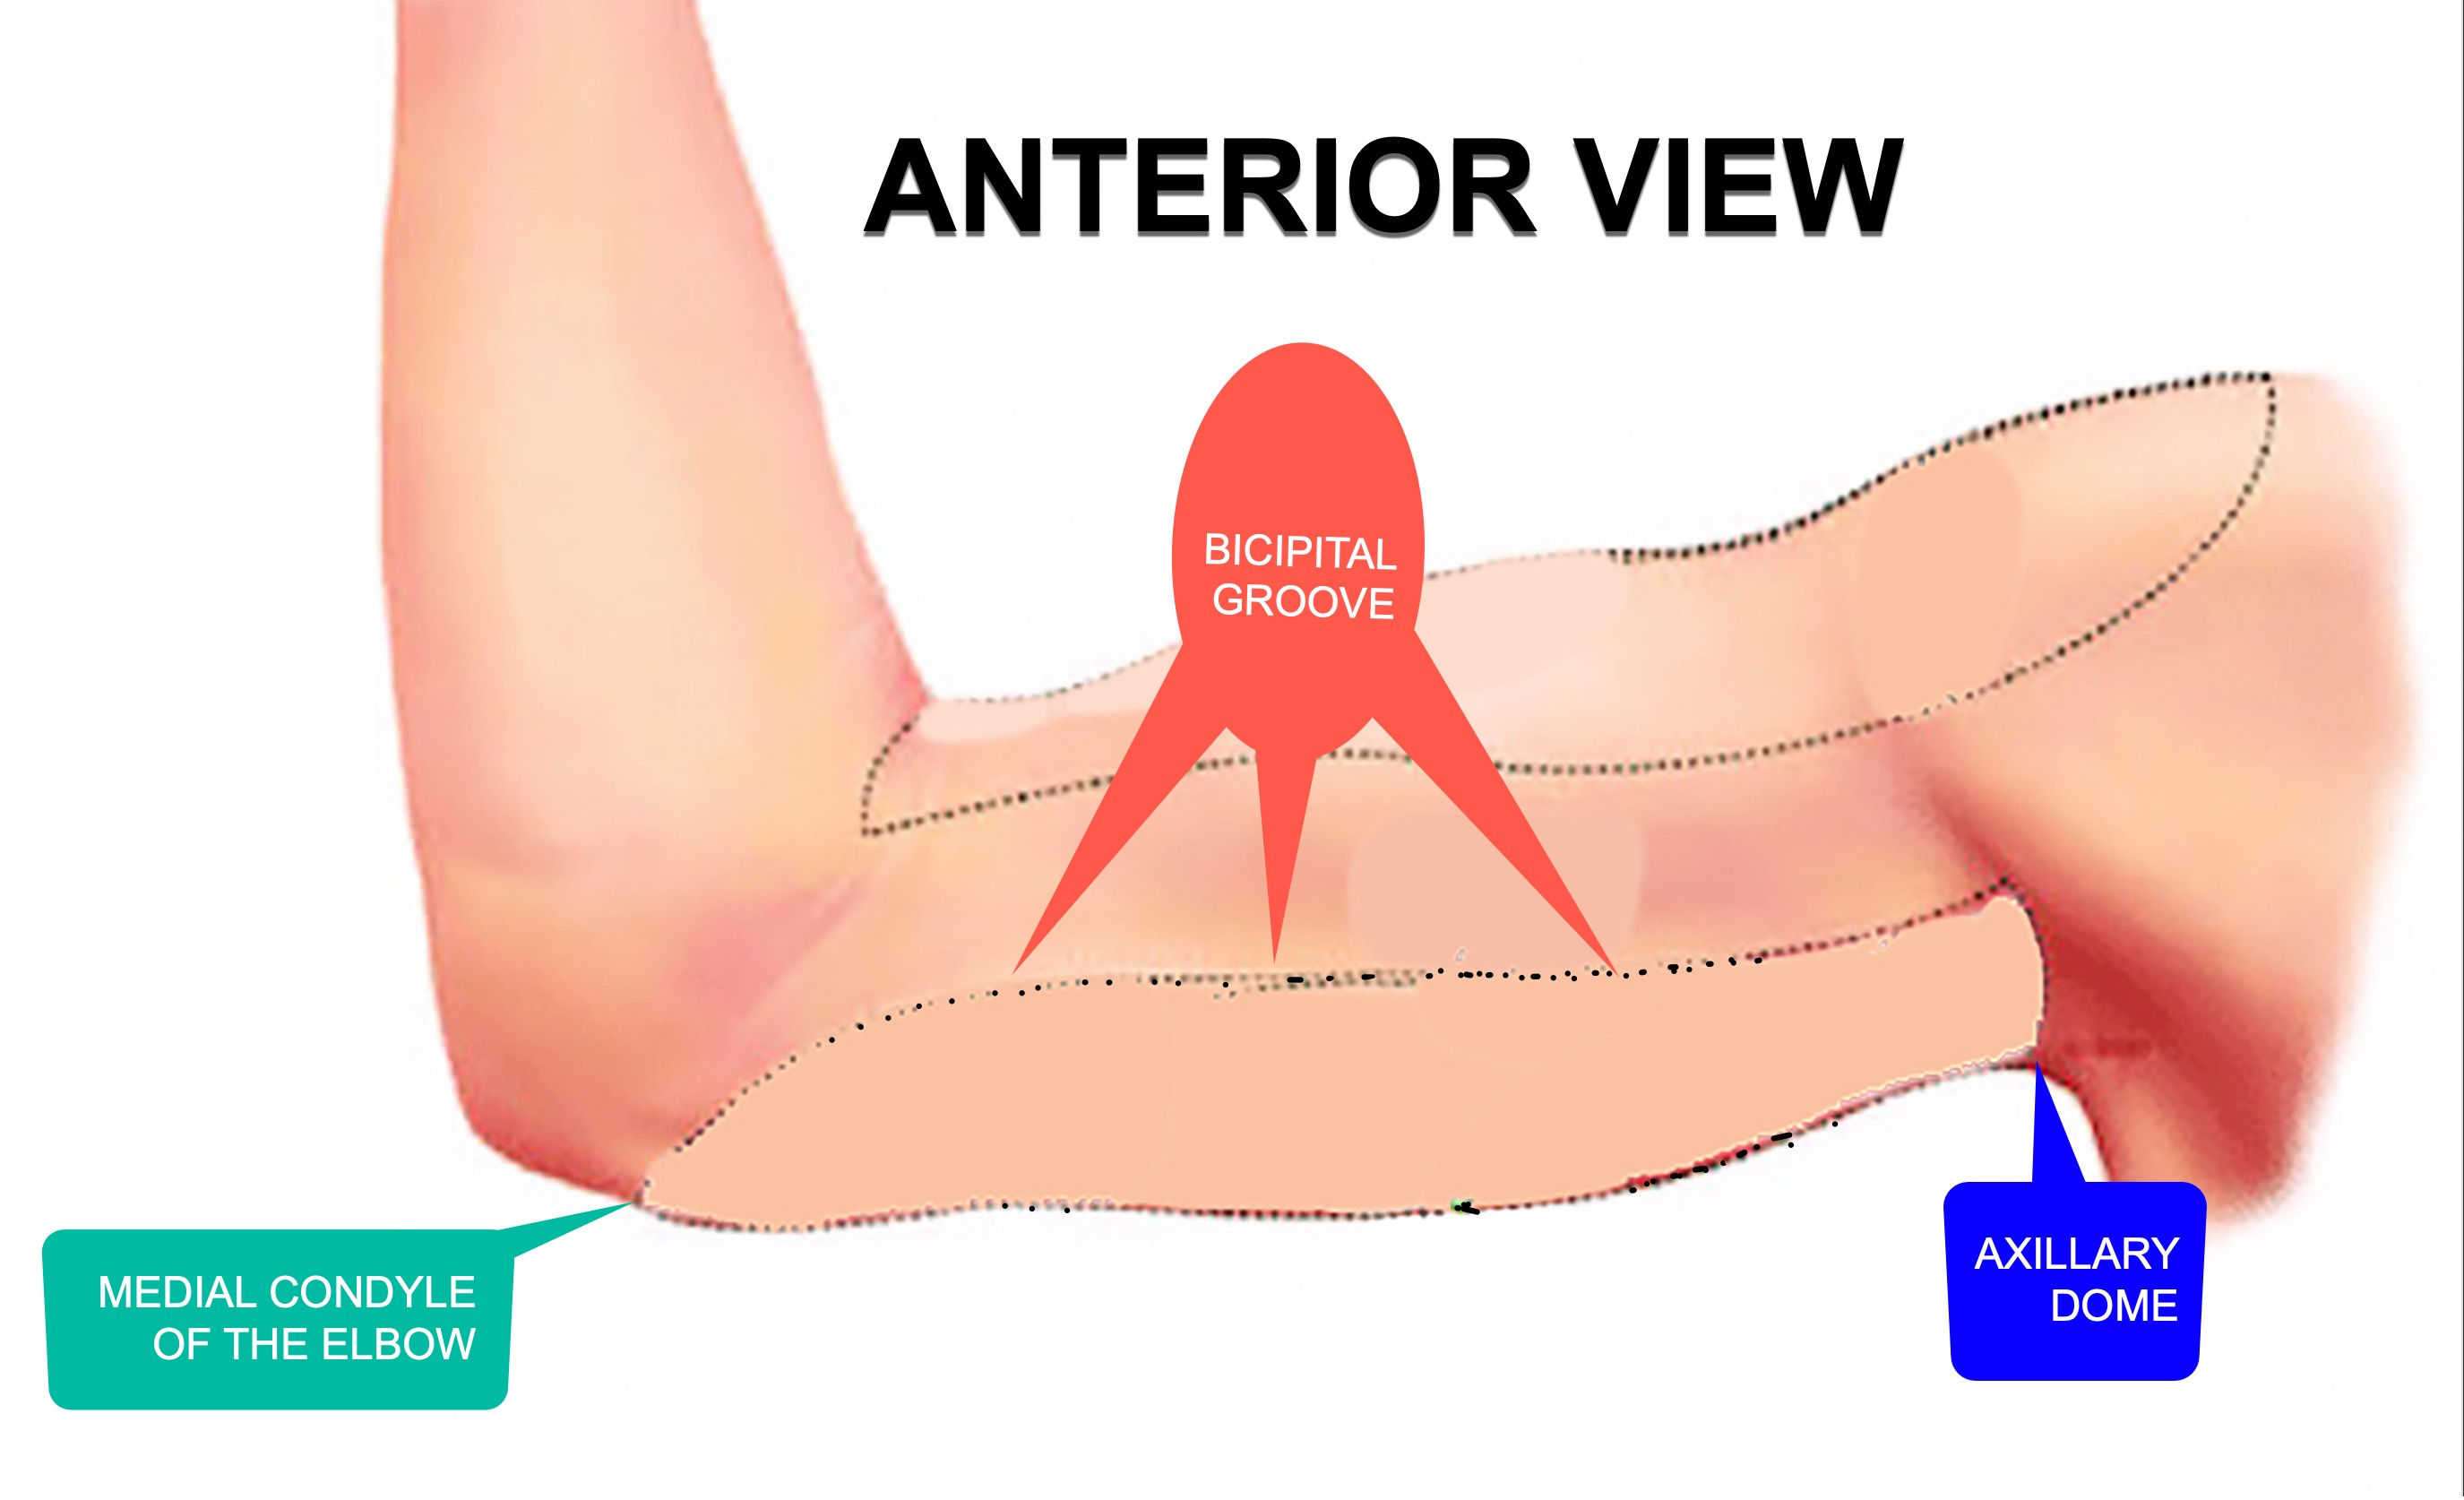
Mark the limits of the chosen area that you wish to reshape with Endopeel.
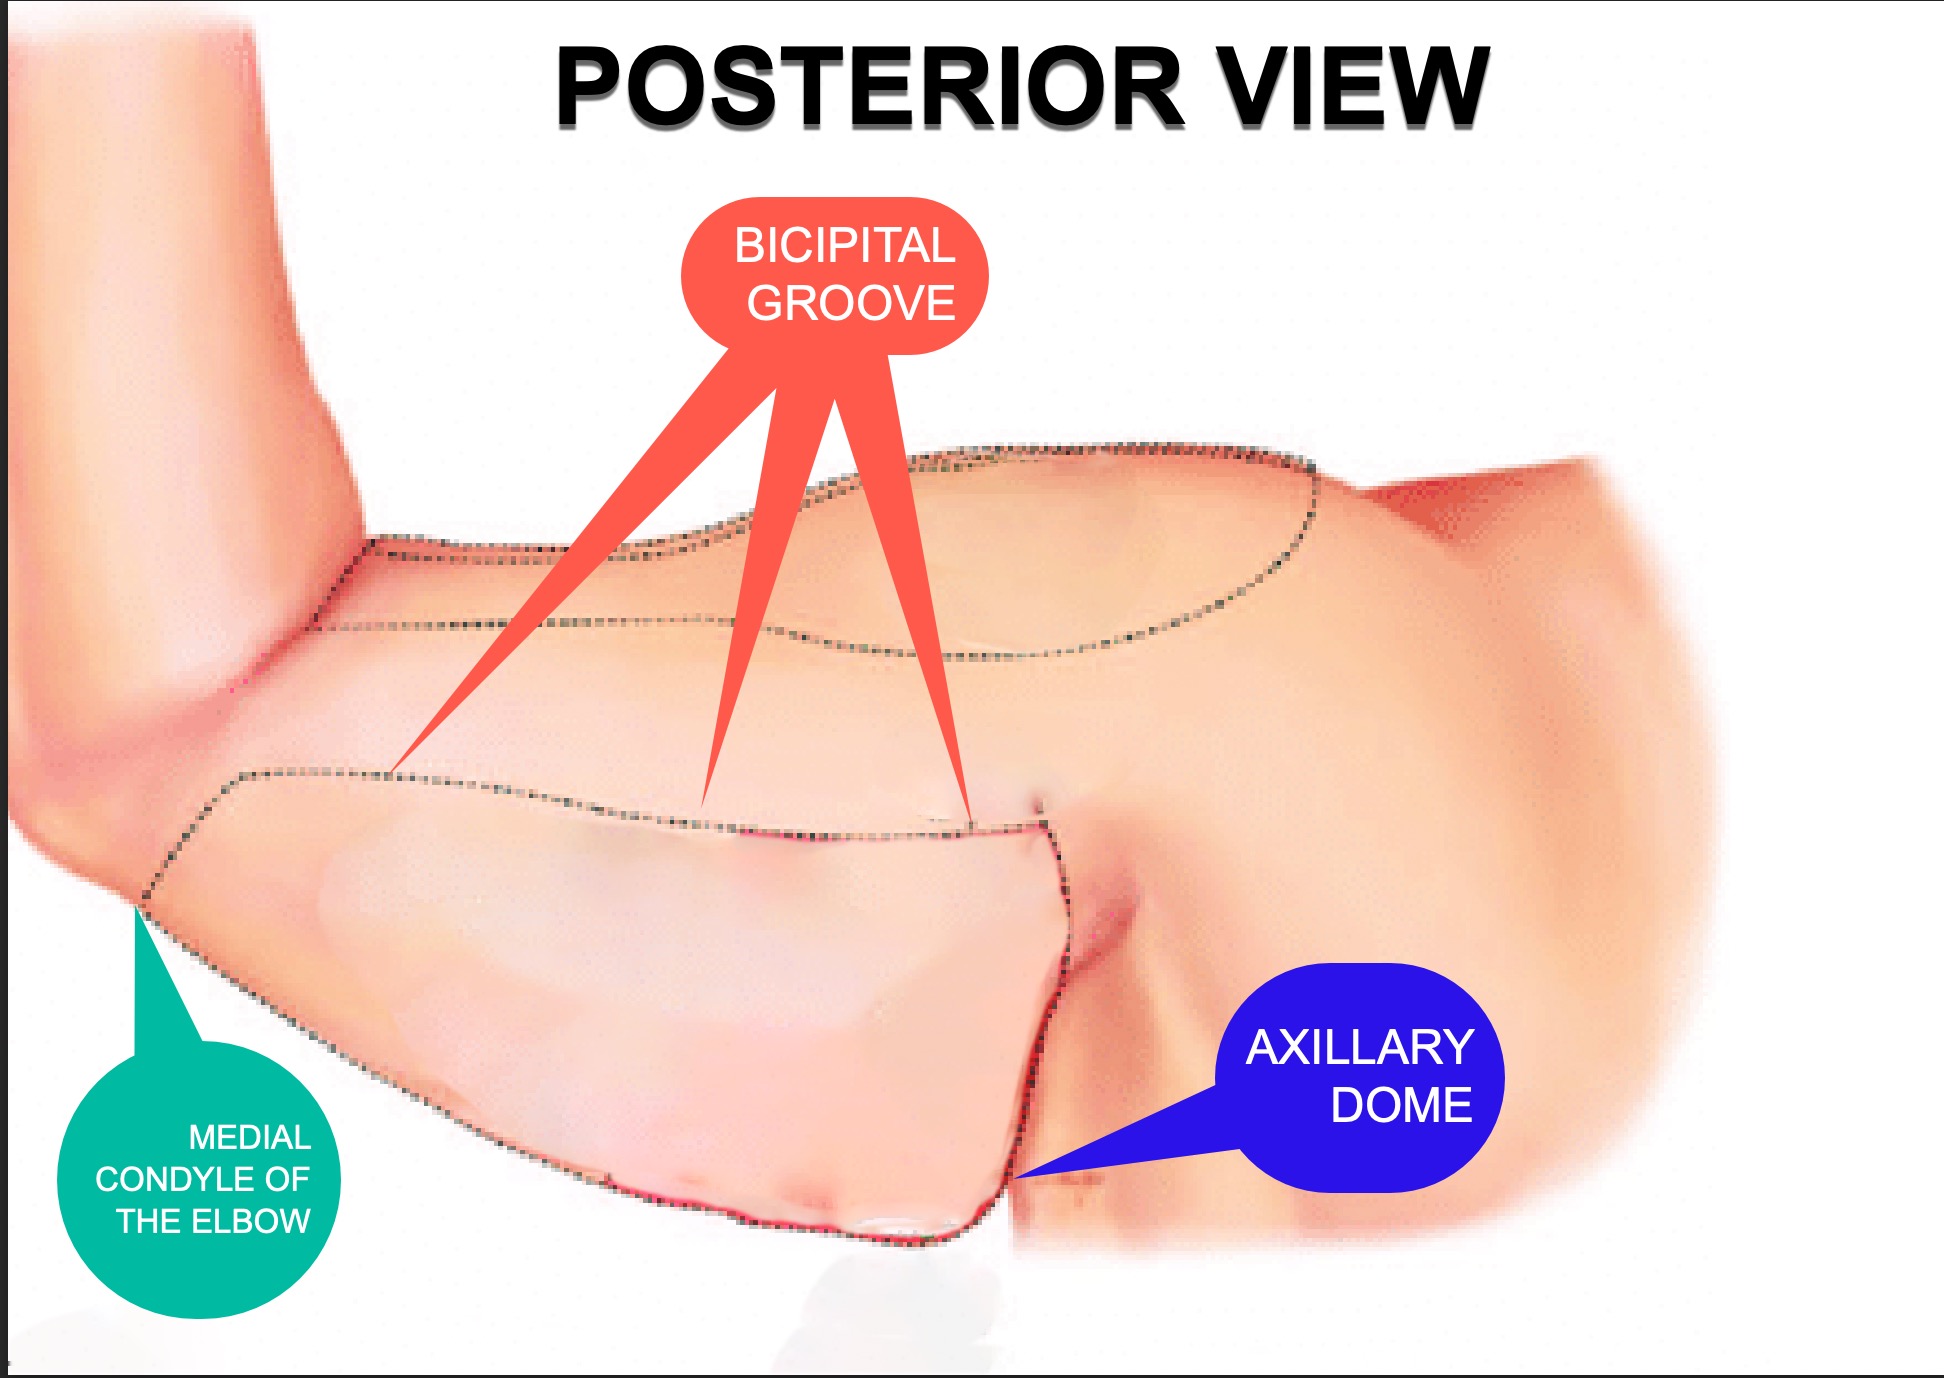
Preoperative markings are made with the patient standing in an upright position. A straight line is drawn in the bicipital groove from the medial condyle of the elbow to the axillary dome.
The posterior view
- Then using like always 1 or 2 tongue depressors, divide the work area in columns
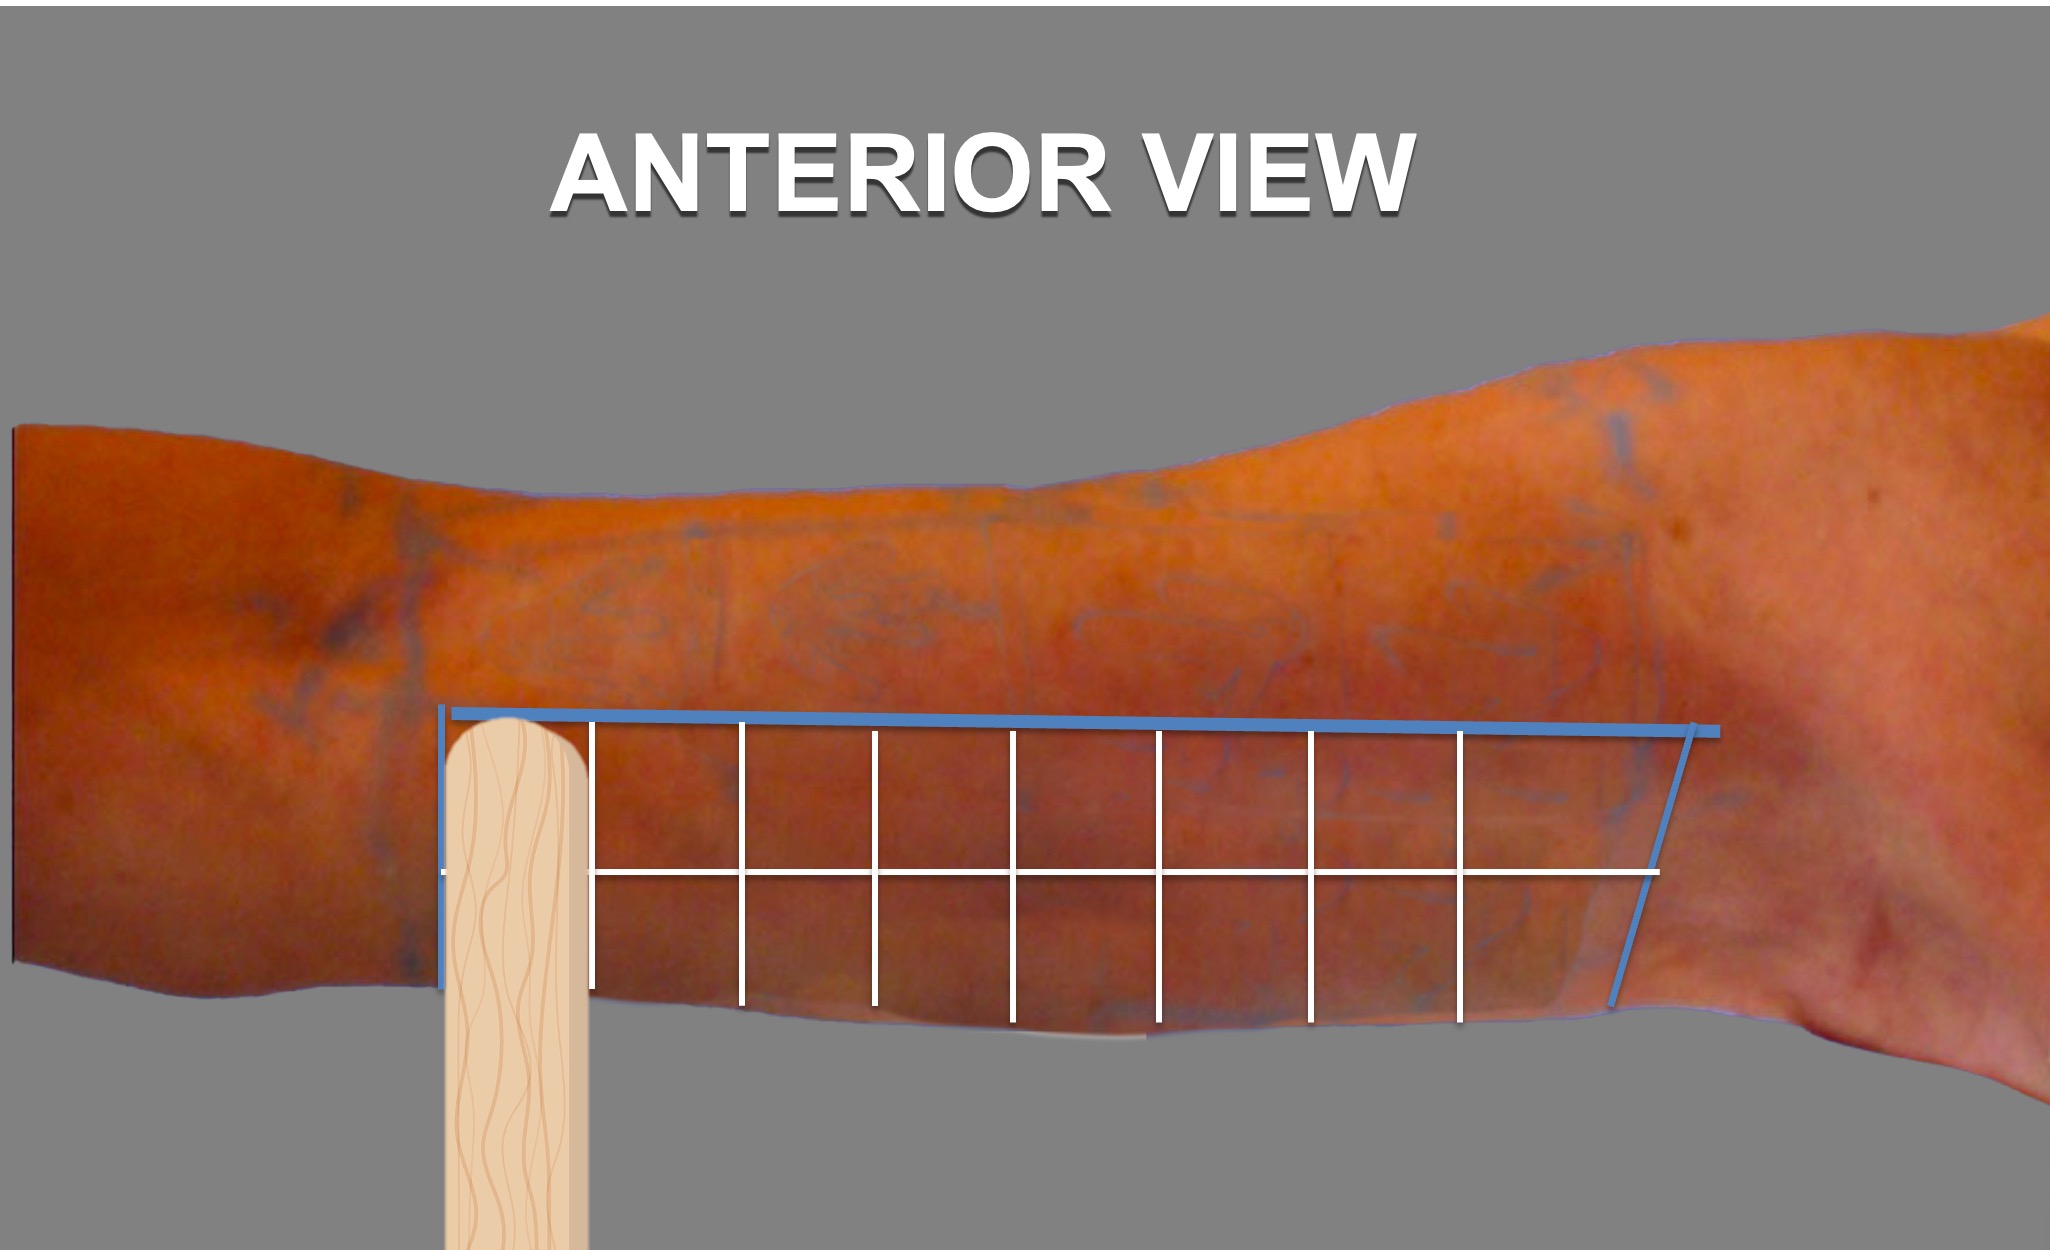
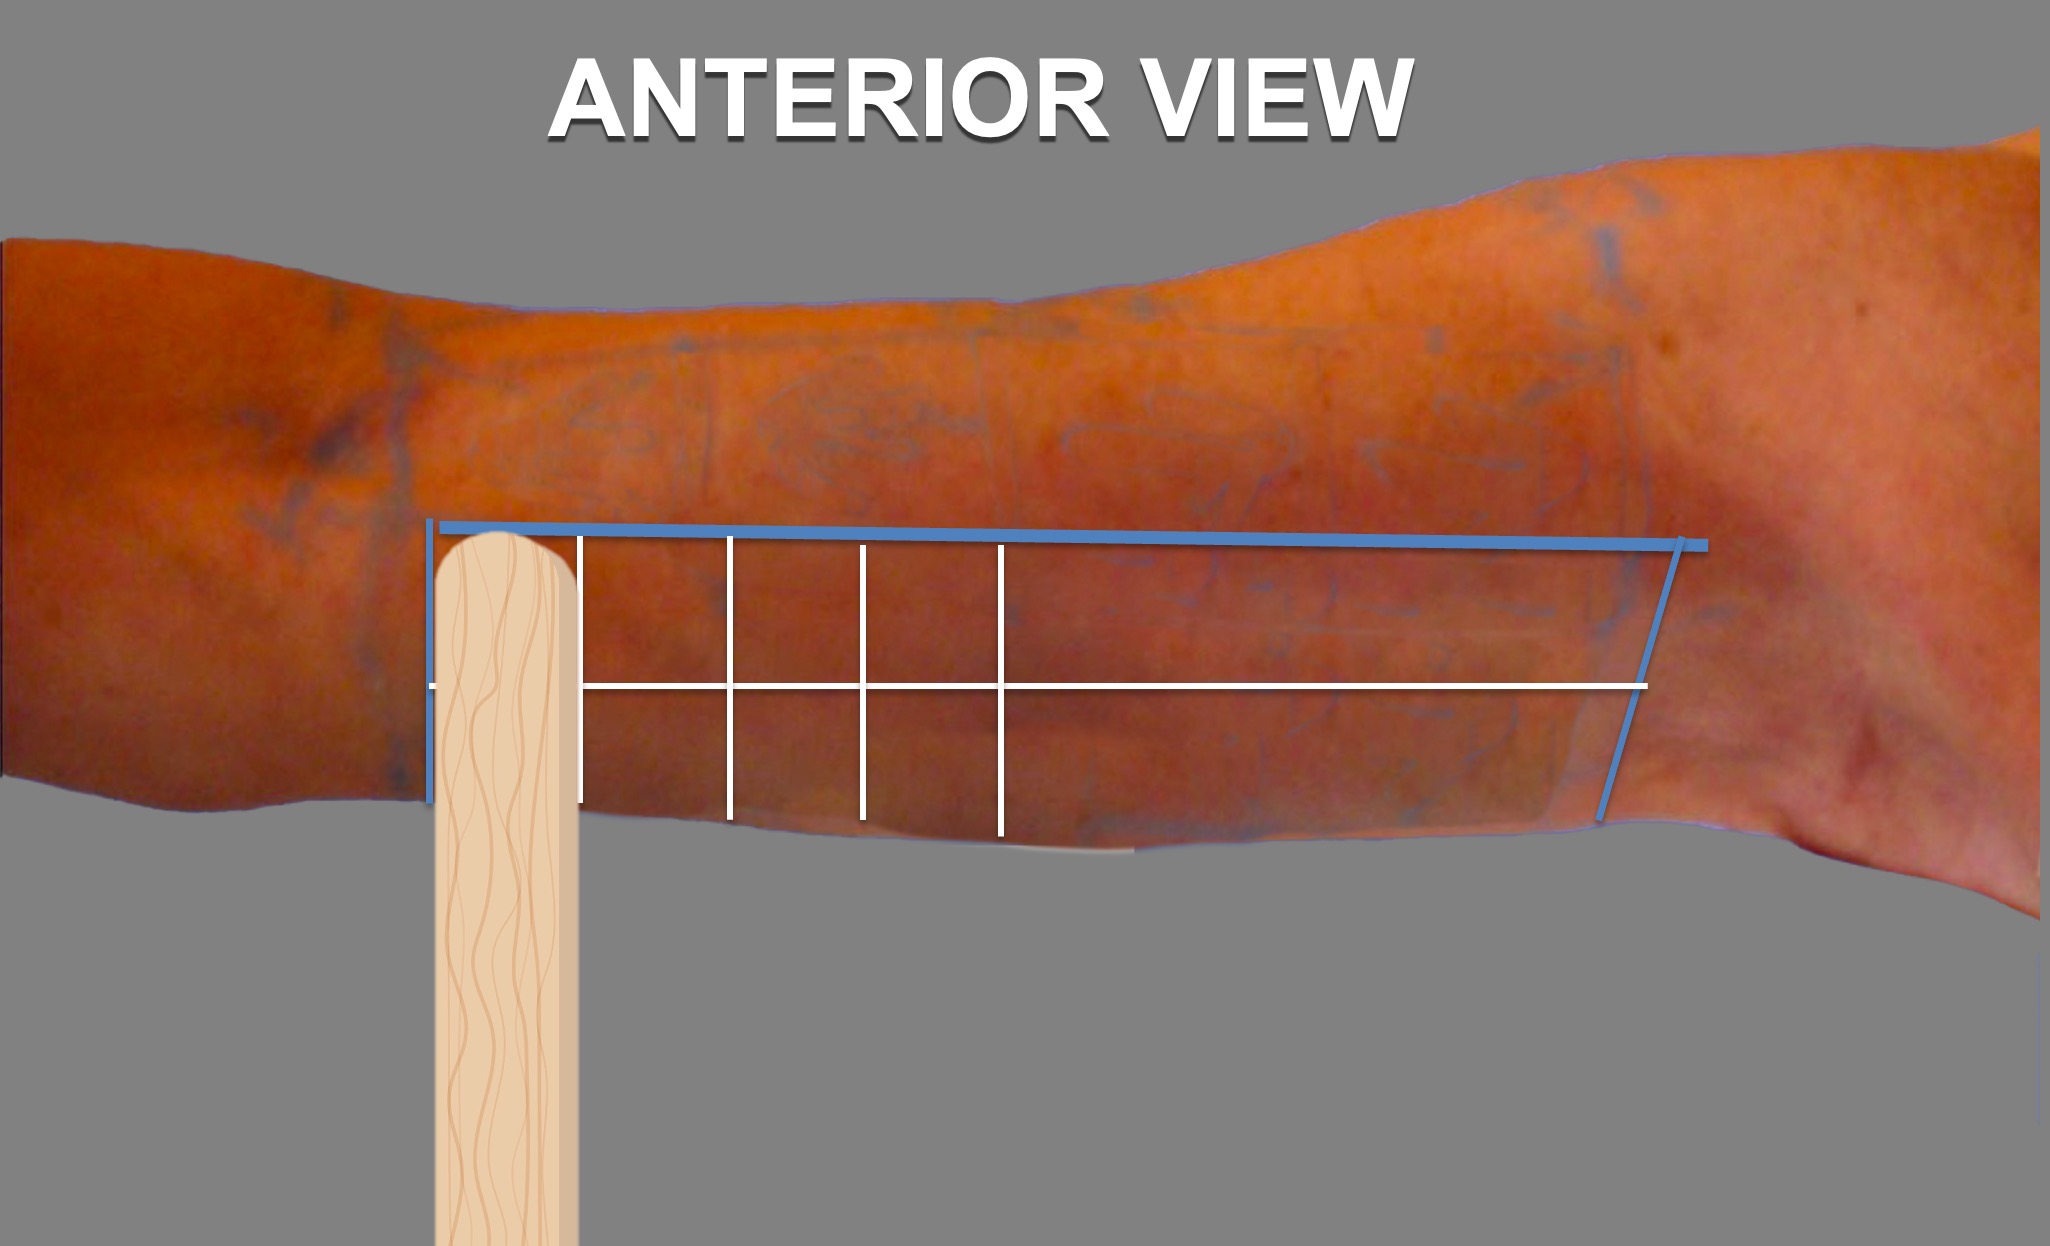
Step 3 :DIVISION OF THE WORK AREA INTO SQUARES
on anterior view
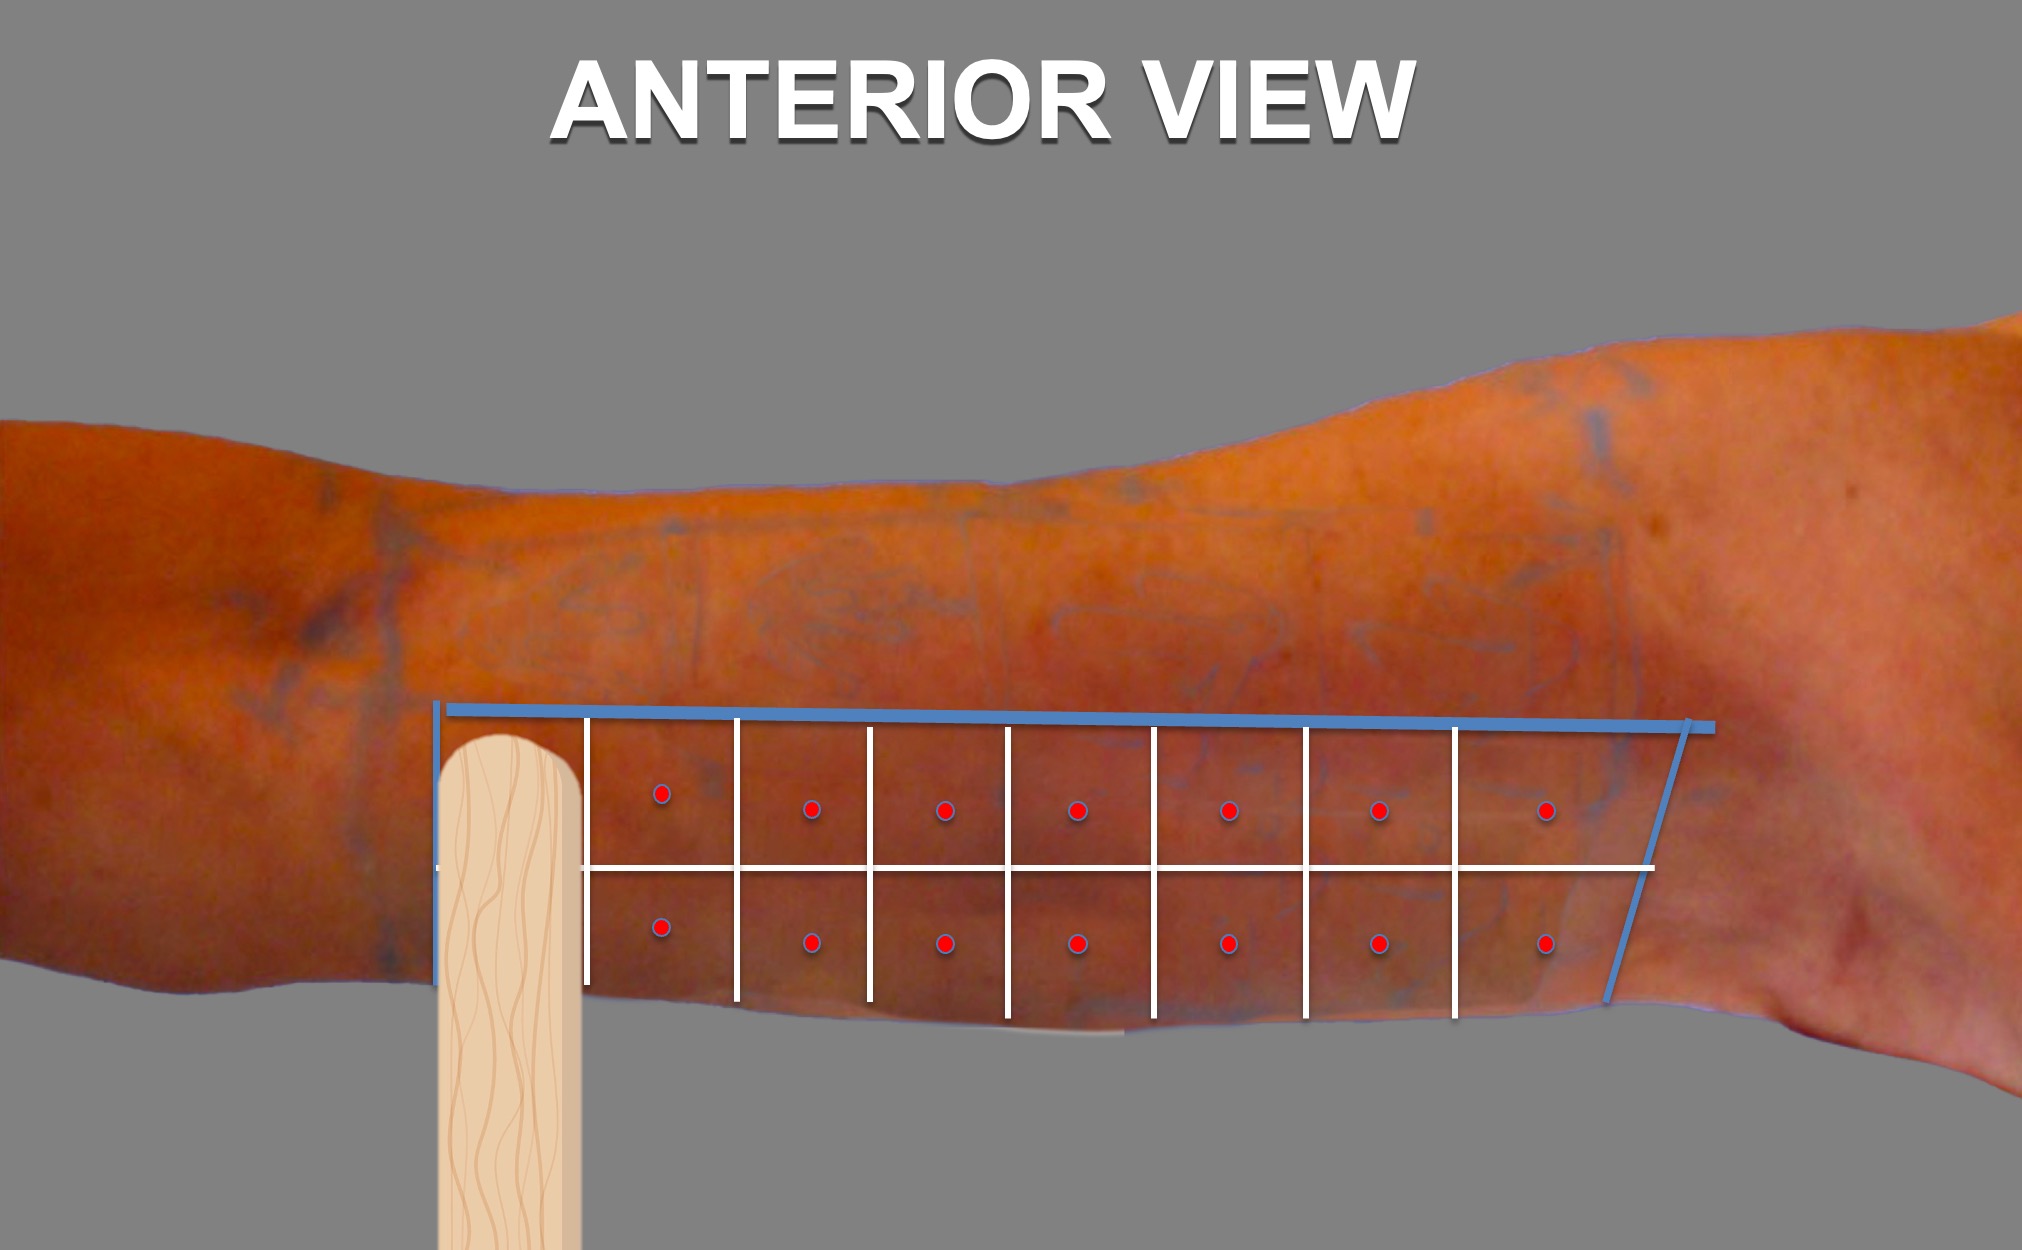
- Place 1 or 2 tongue depressor(-s) , parallel to the bicipital groove, between the medial condyle of the elbow and the axillary dome.
- to divide the work area in rows
- You may get 2 rows with 1 or 2 tongue depressors placed horizontally.
- The height of each row can be equivalent to 1 or 2 tongue depressors,because the height between the bicipital groove and the lower edge of the arm varies in size or height for each patient.
Step 4 : Division of the work area into squares
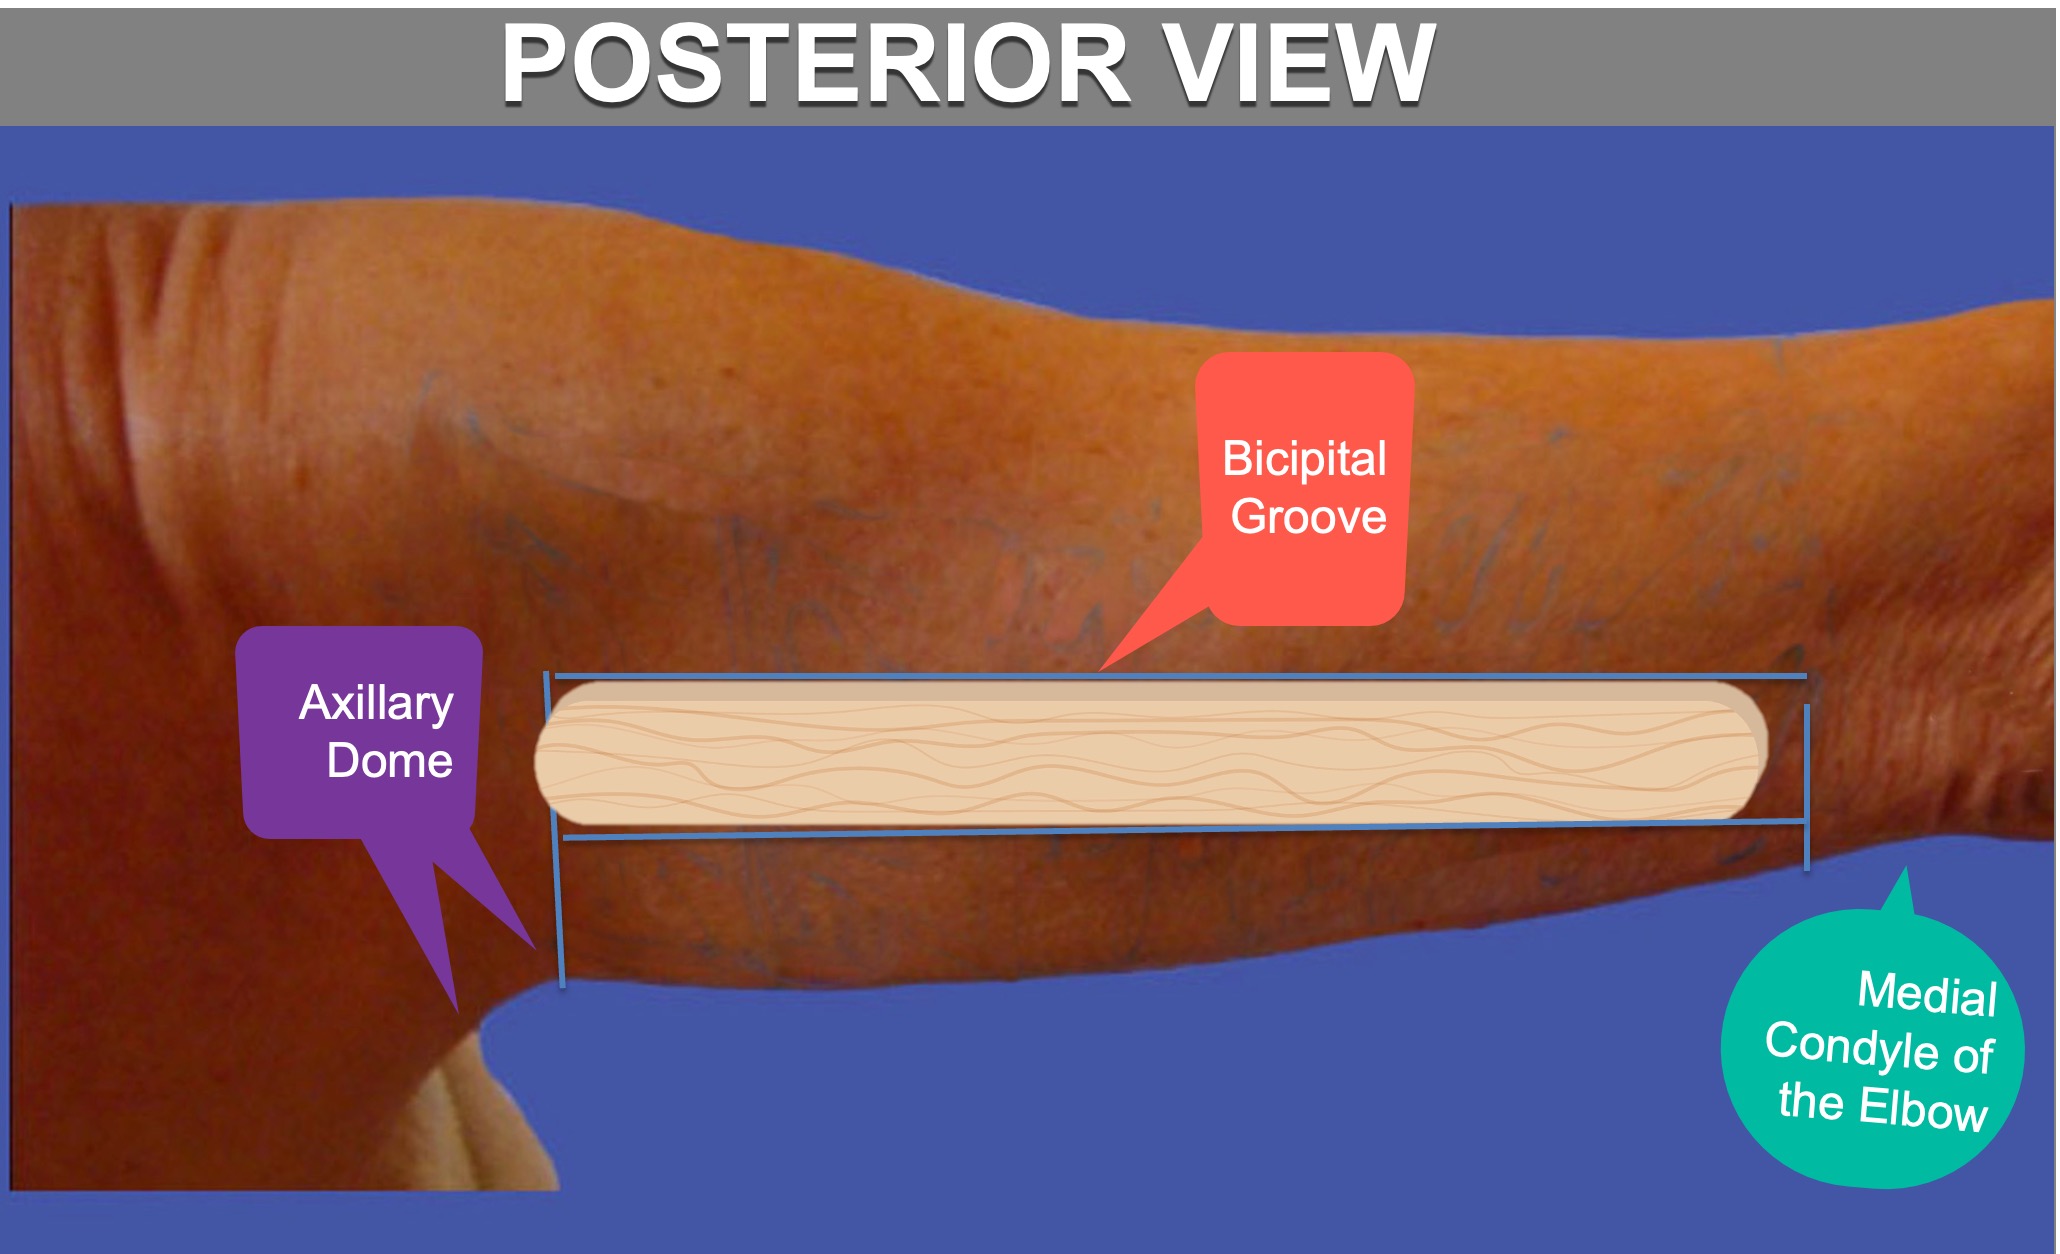
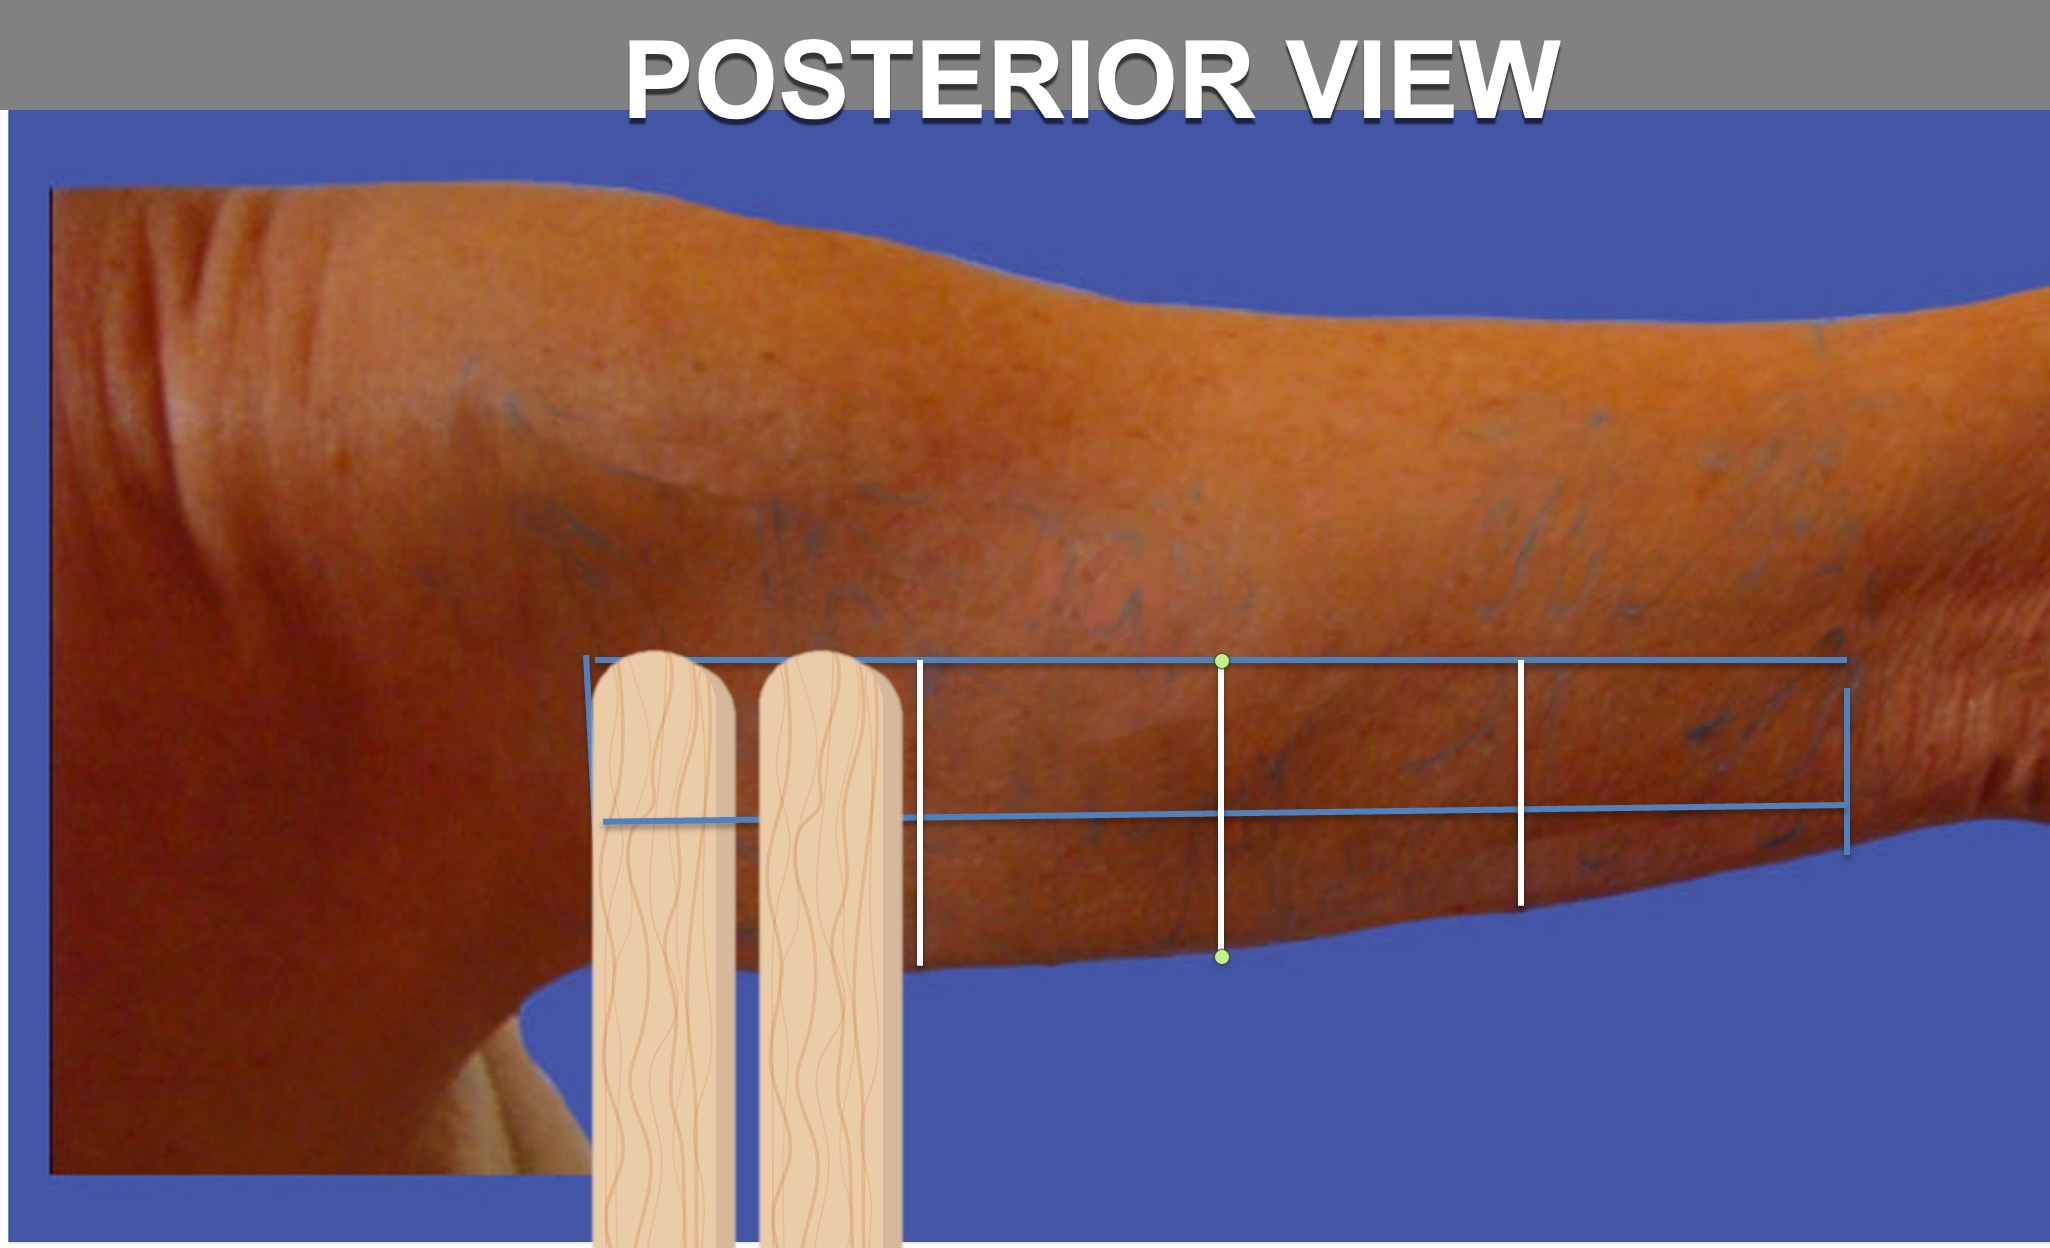
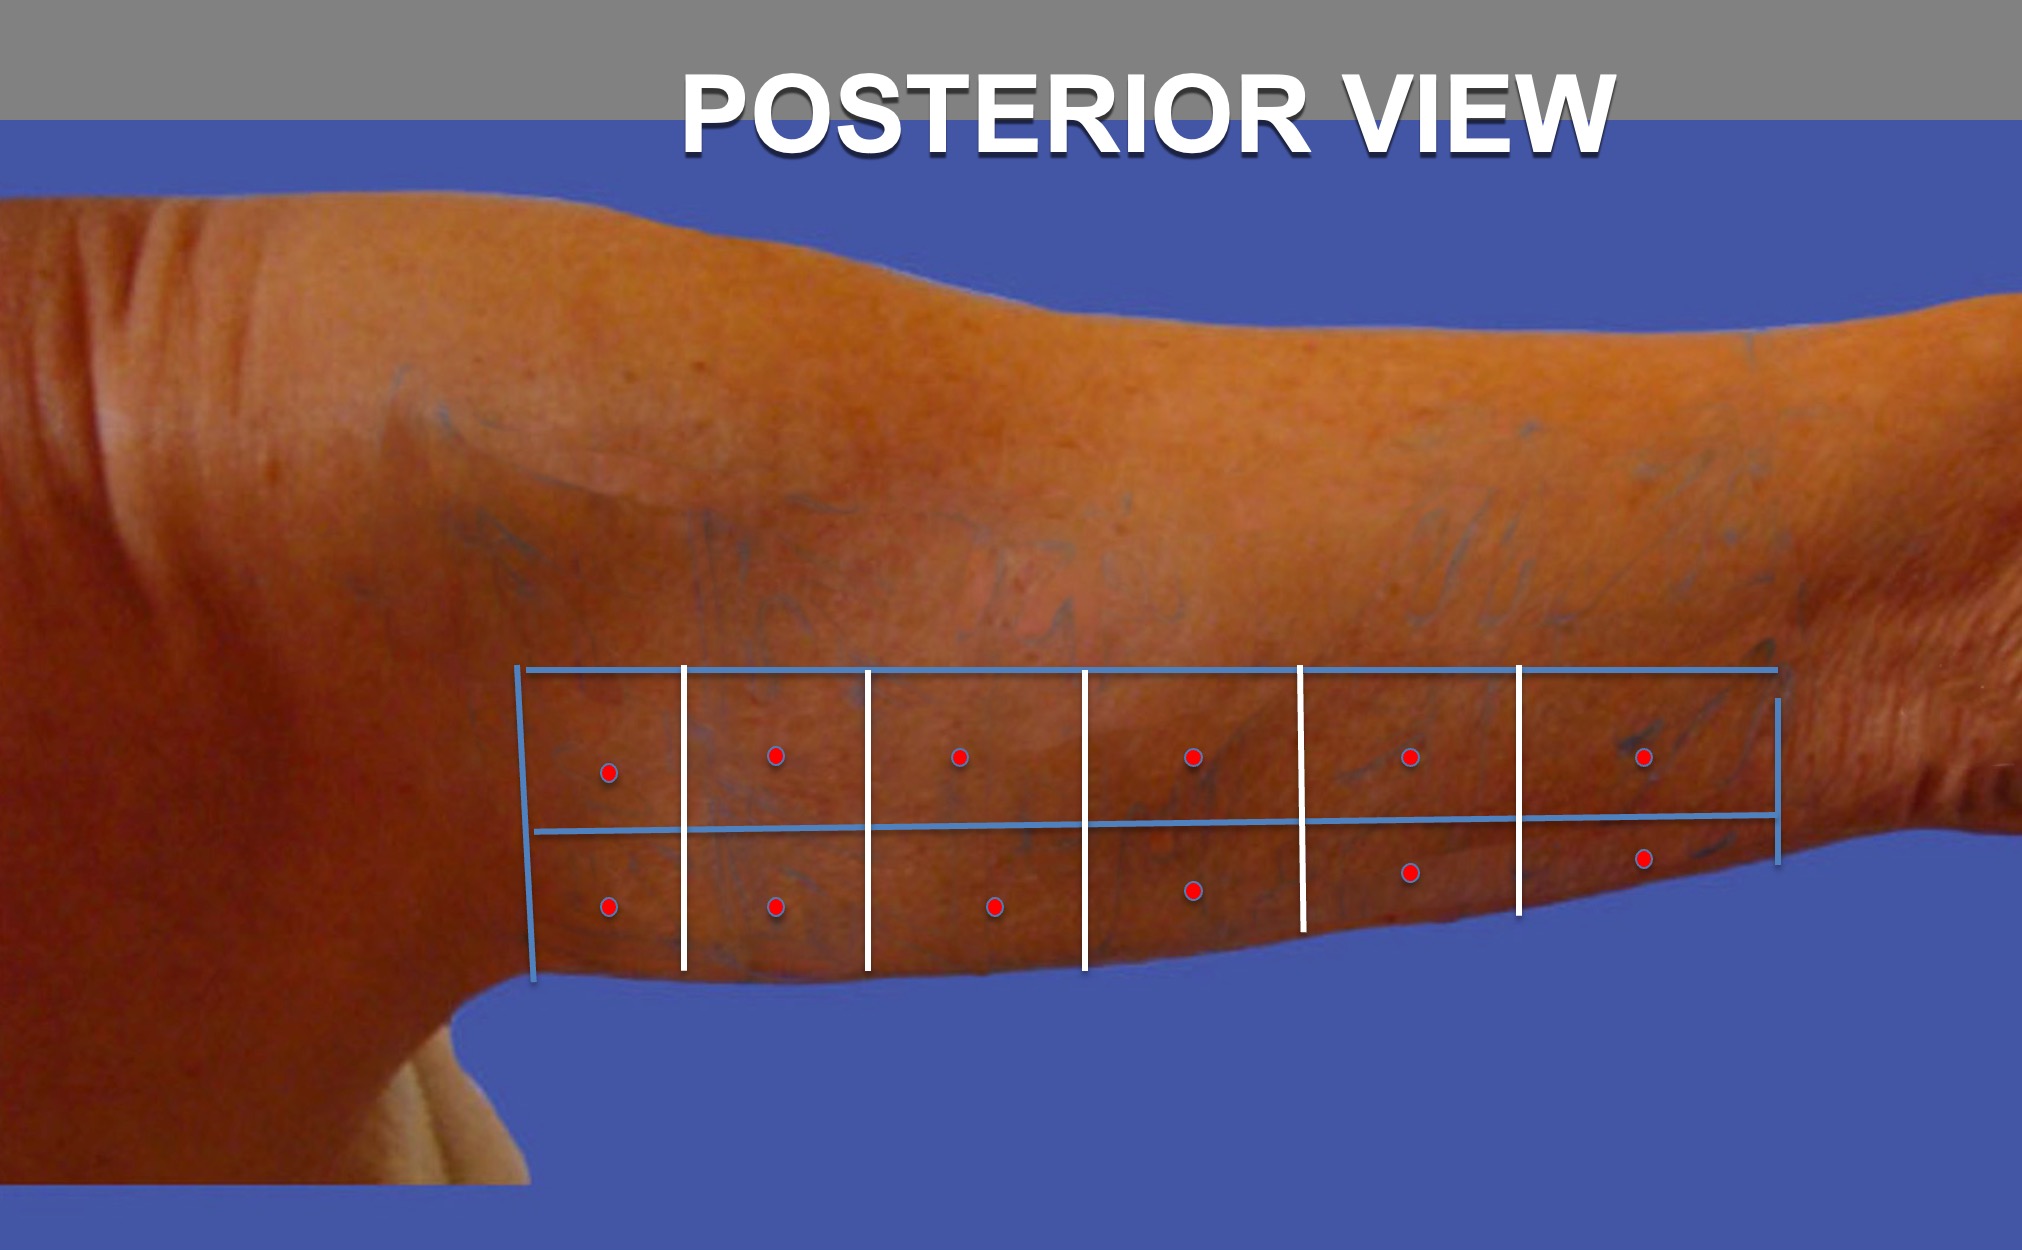
Posterior View
- Place 1 or 2 tongue depressor(-s) , parallel to the bicipital groove, between the medial condyle of the elbow and the axillary dome.
- to divide the work area in rows
- You may get 2 rows with 1 or 2 tongue depressors placed horizontally.
- The height of each row can be equivalent to 1 or 2 tongue depressors,because the height between the bicipital groove and the lower edge of the arm varies in size or height for each patient.
- Then using like always 1 or 2 tongue depressors, divide the work area in columns.
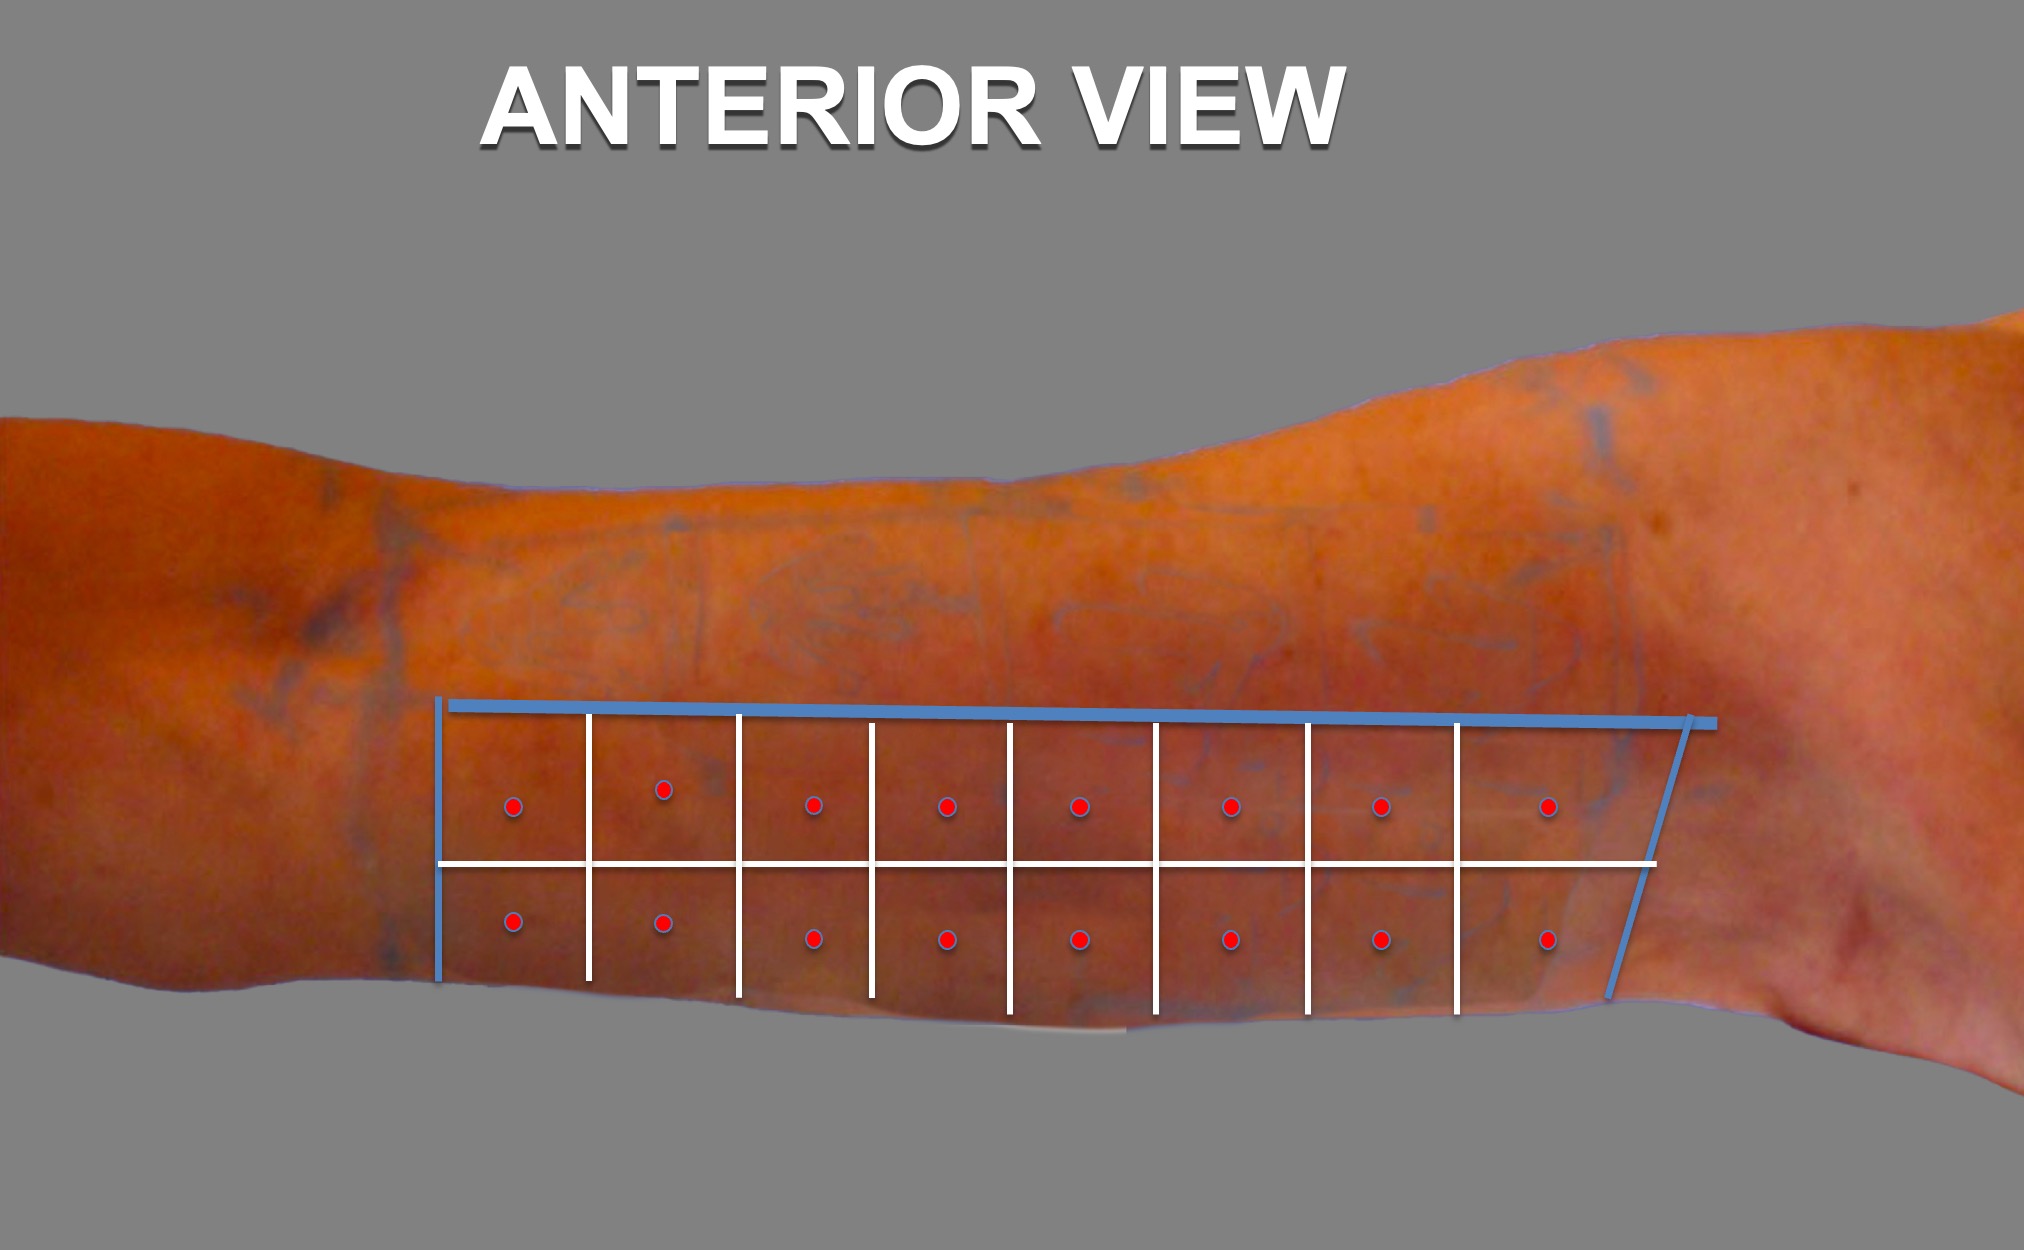
Step 5 : Vectors-Anterior View
-
1 Vector per each square, placed at the center of each square
-
Vectors are always normal, or in a perpendicular plan to the center of each square .
-
Quantity to inject per vector is 0.05 ml if divisions into squares have been made with 1 tongue depressor and 0.1 ml if divisions into squares have been made with 2 tongue depressors.
-
1 Vector per each square, placed at the center of each square
-
Vectors are always normal, or in a perpendicular plan to the center of each square .
-
Quantity to inject per vector is 0.05 ml if divisions into squares have been made with 1 tongue depressor and 0.1 ml if divisions into squares have been made with 2 tongue depressors.
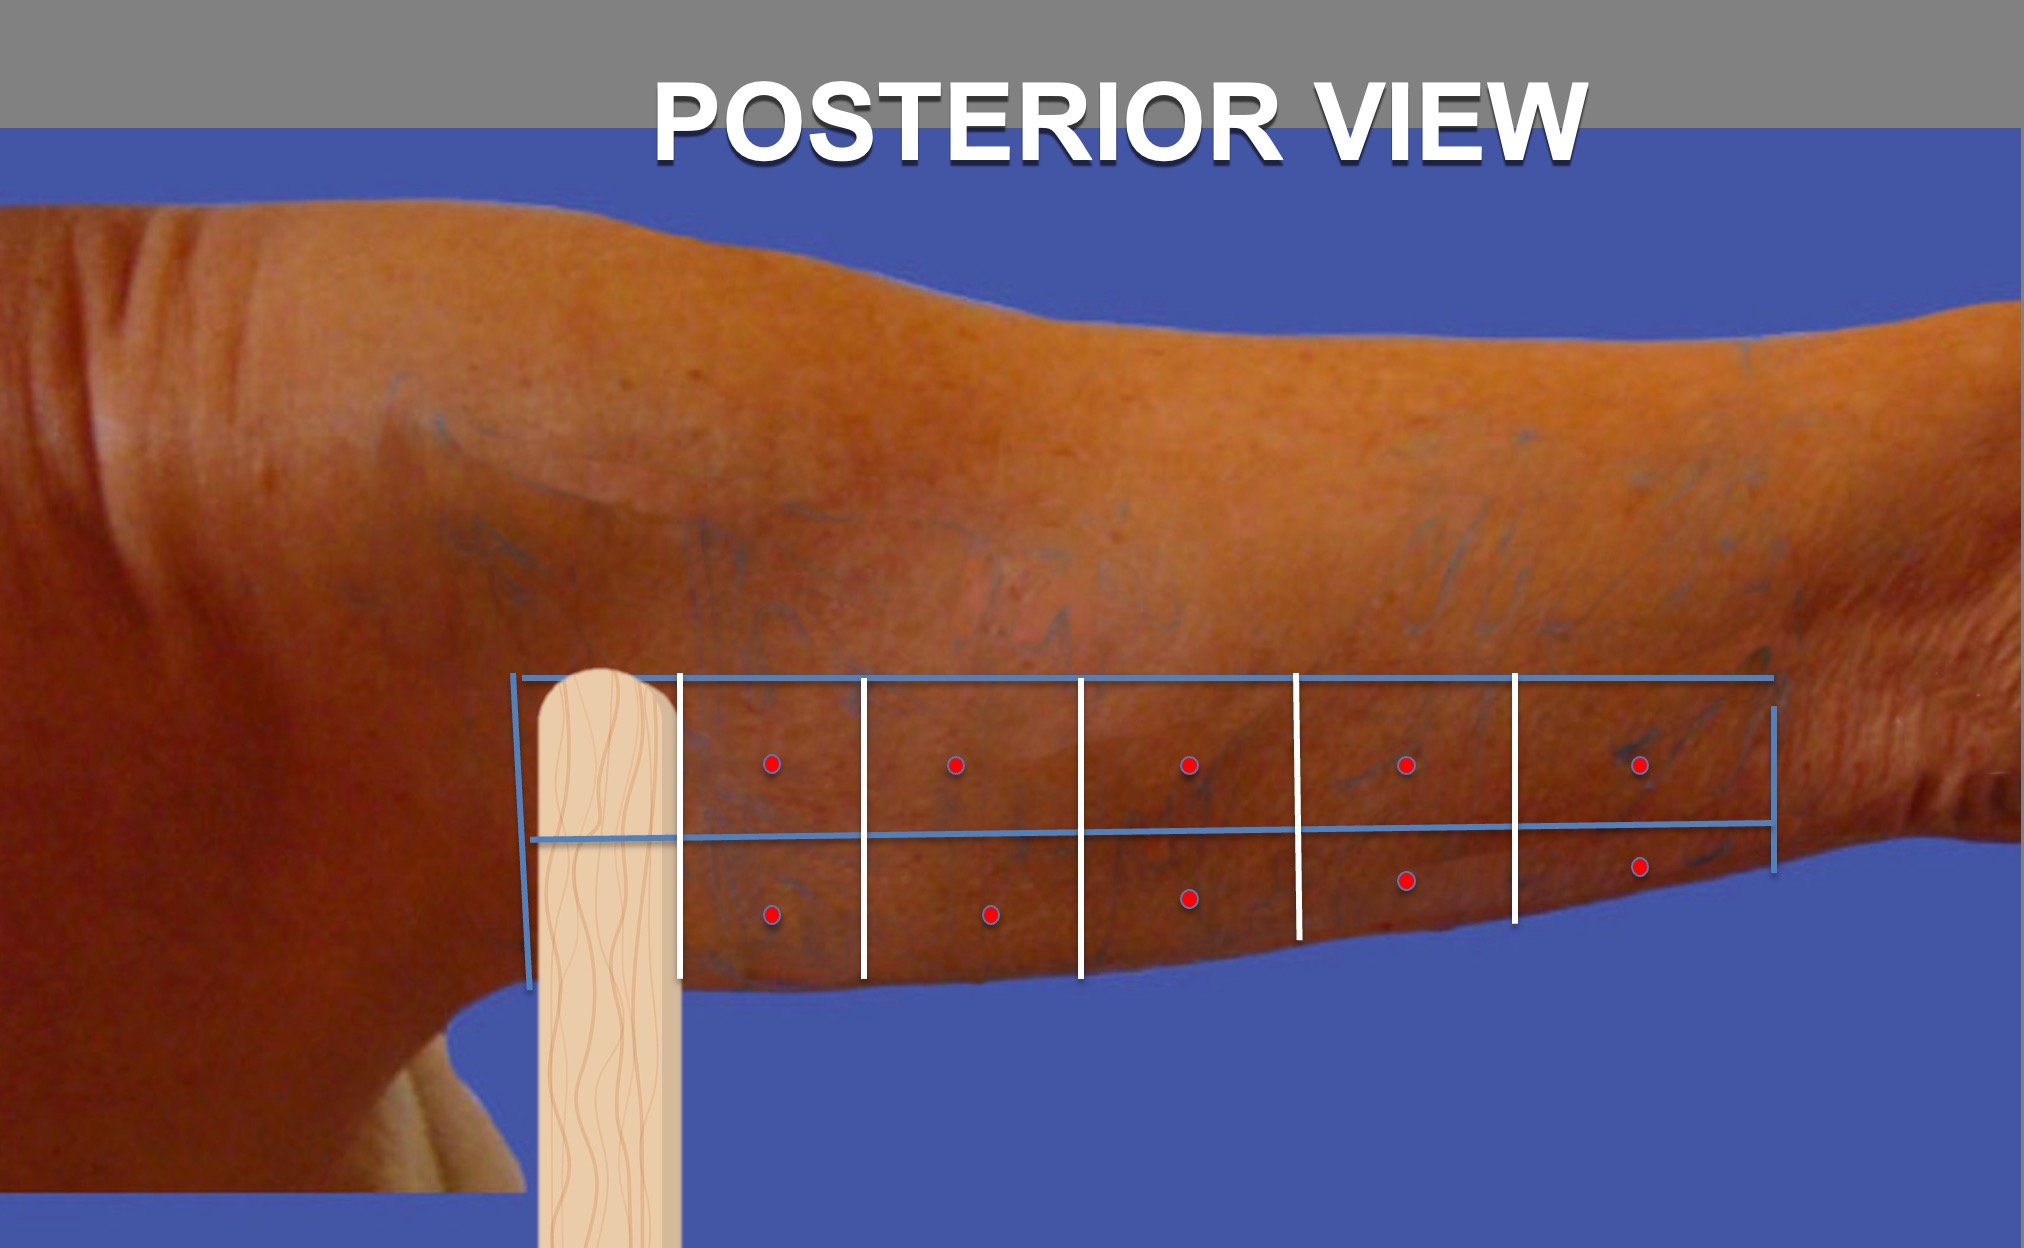
Step 6 : Vectors-Posterior View
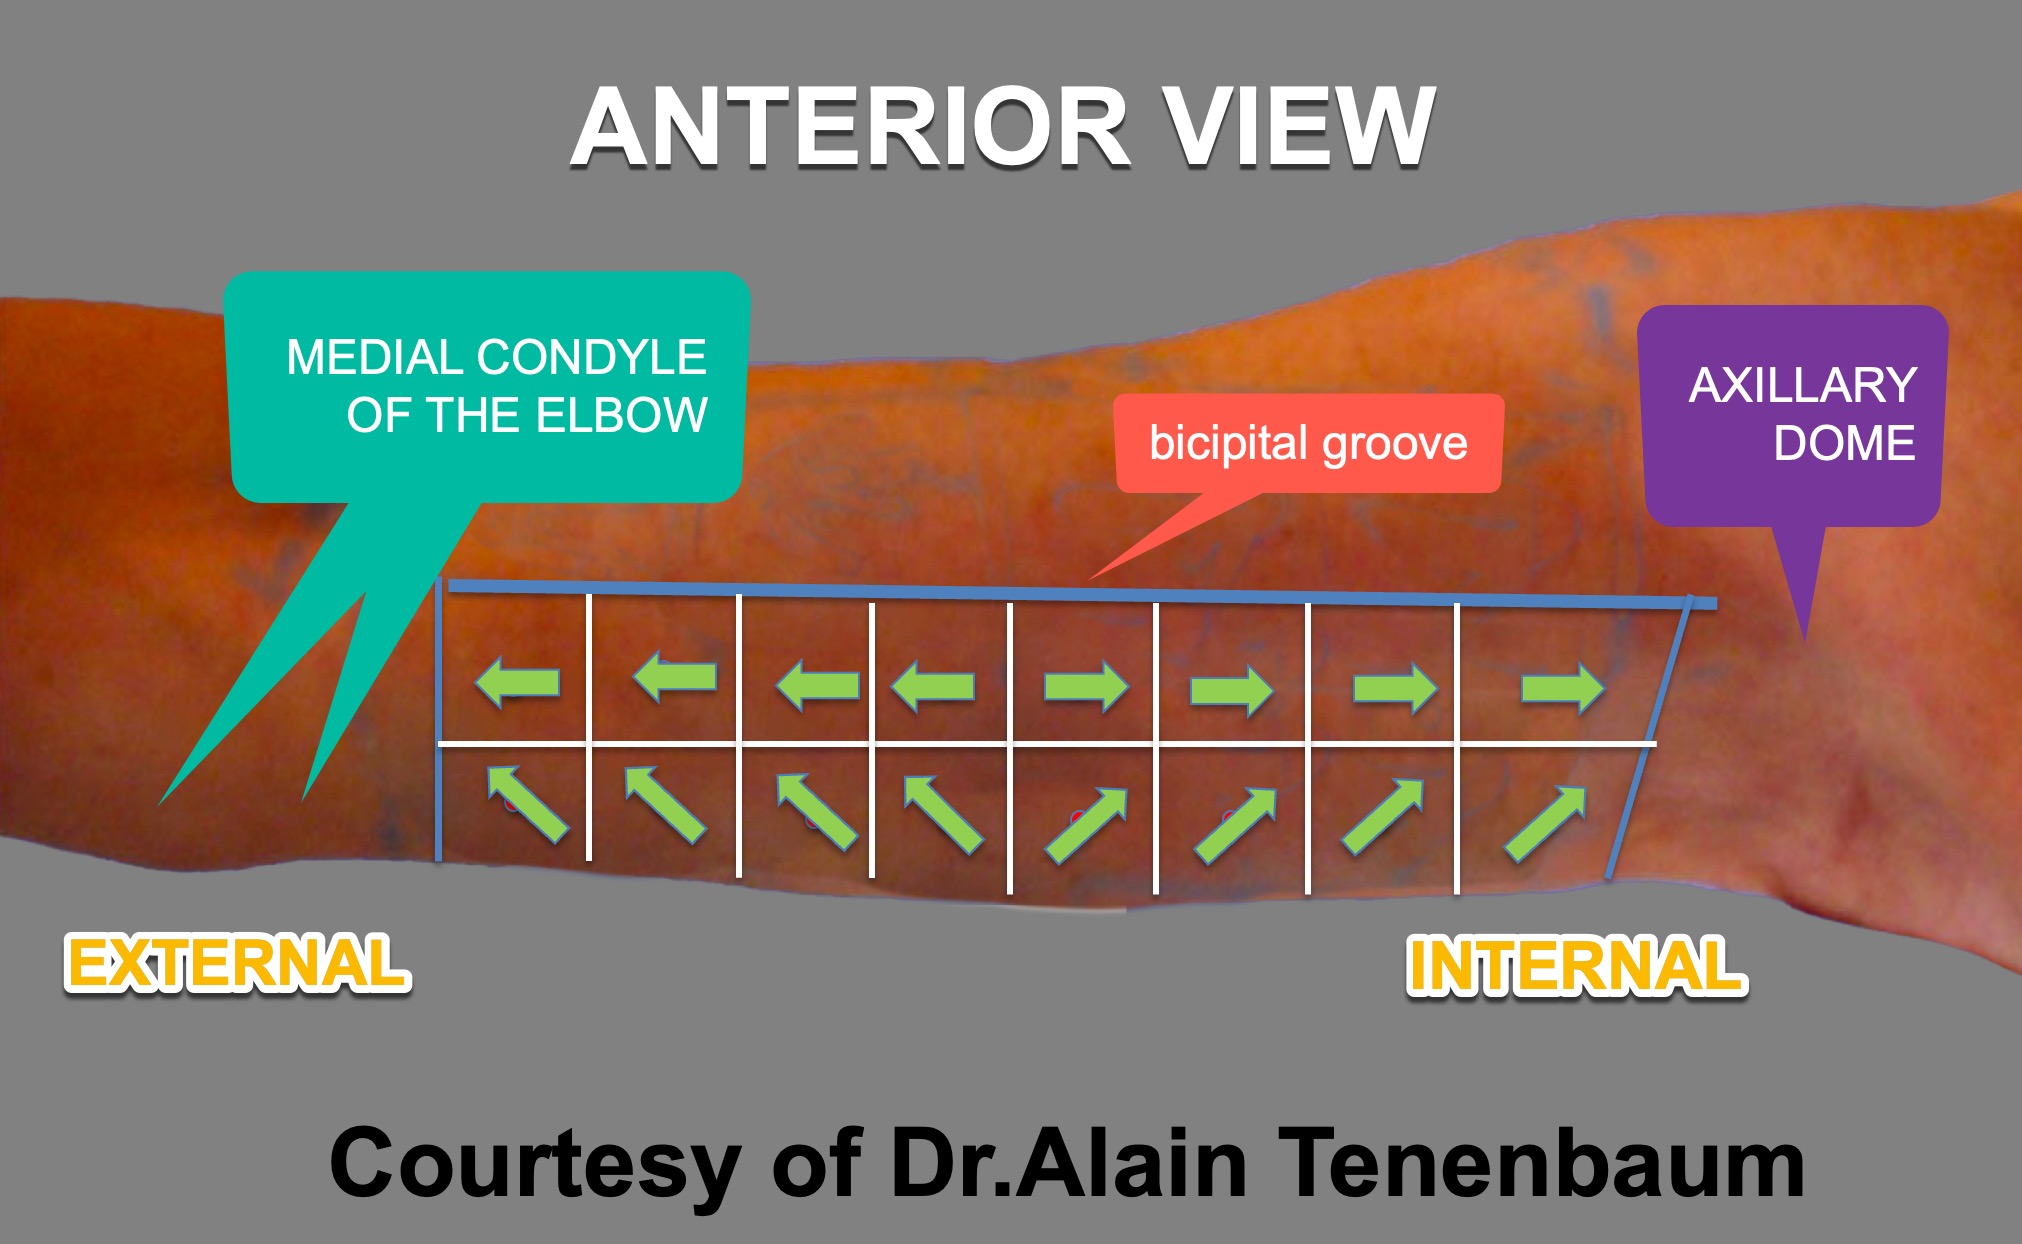
Step 7 : Tensors-Anterior View
-
1 Tensor per each square.
-
Tensors are designed using arrows,how would look the bottom edge of the arm ,using the left hand ( if your right is dominant) to lift each square upwards,or above the bicipital groove,toward the axillary dome ( internal)or the medial condyle of the elbow (external).
-
Quantity to inject per tensor is 0.05 ml if divisions into squares have been made with 1 tongue depressor and 0.1 ml if divisions into squares have been made with 2 tongue depressors.
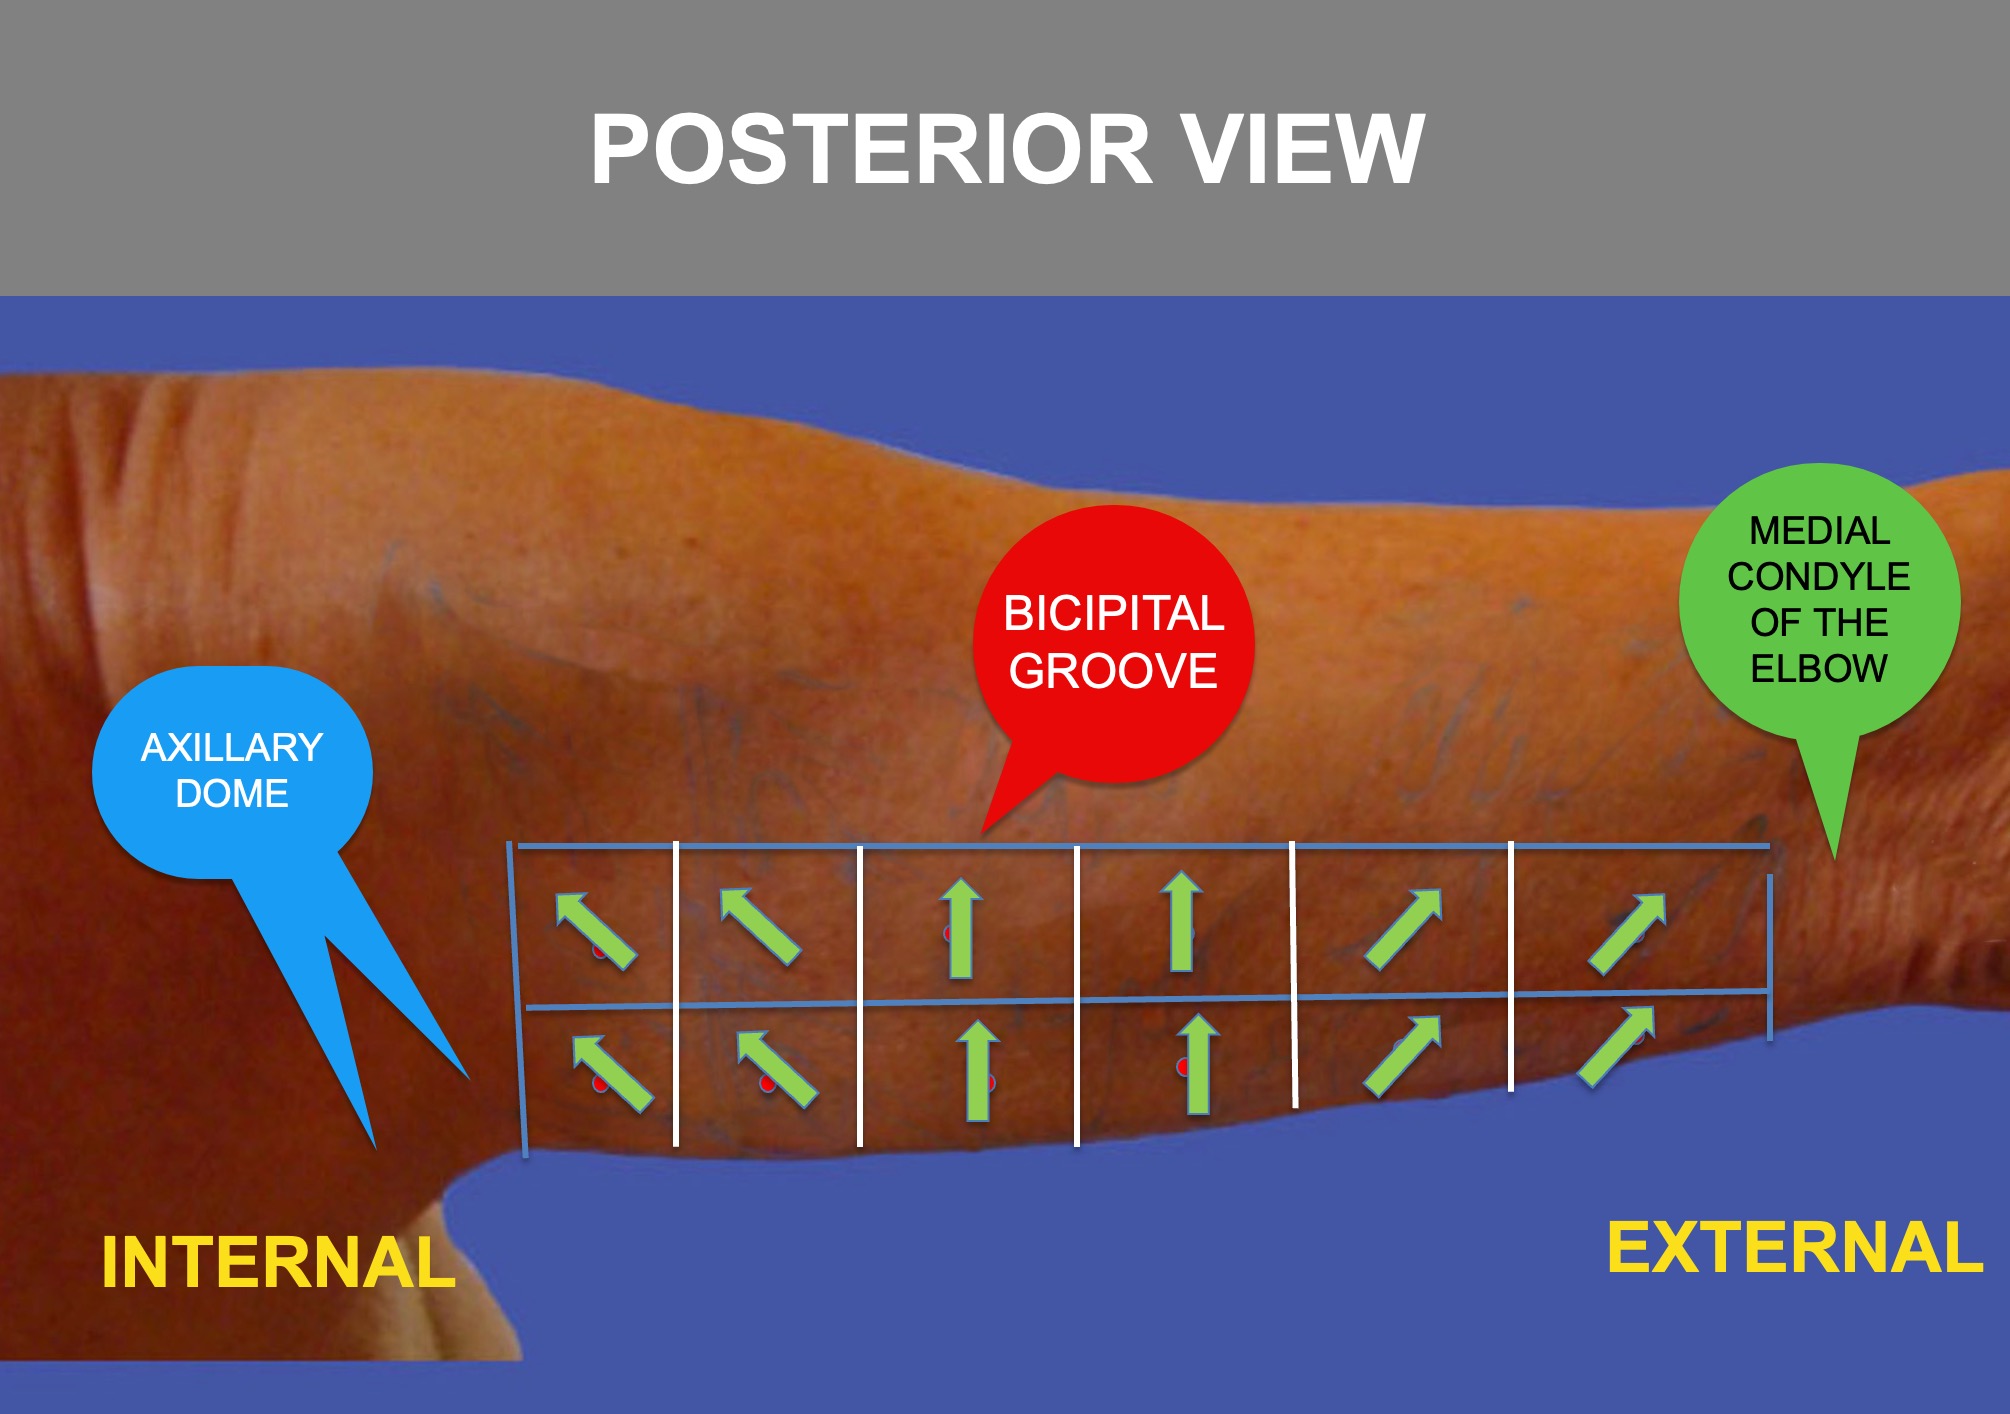
Step 8 : Marking the tensors-Posterior View
-
1 Tensor per each square.
-
Tensors are designed using arrows,how would look the bottom edge of the arm ,using the left hand ( if your right is dominant) to lift each square upwards,or above the bicipital groove,toward the axillary dome ( internal)or the medial condyle of the elbow (external).
-
Quantity to inject per tensor is 0.05 ml if divisions into squares have been made with 1 tongue depressor and 0.1 ml if divisions into squares have been made with 2 tongue depressors.
-
for didactic reasons, the tensors of the central columns are vertical looking up, and the tensors of the other columns look towards the axillary dome if internal or the medial condyle of the elbow if external.
1-Injection of Vectors-Anterior View
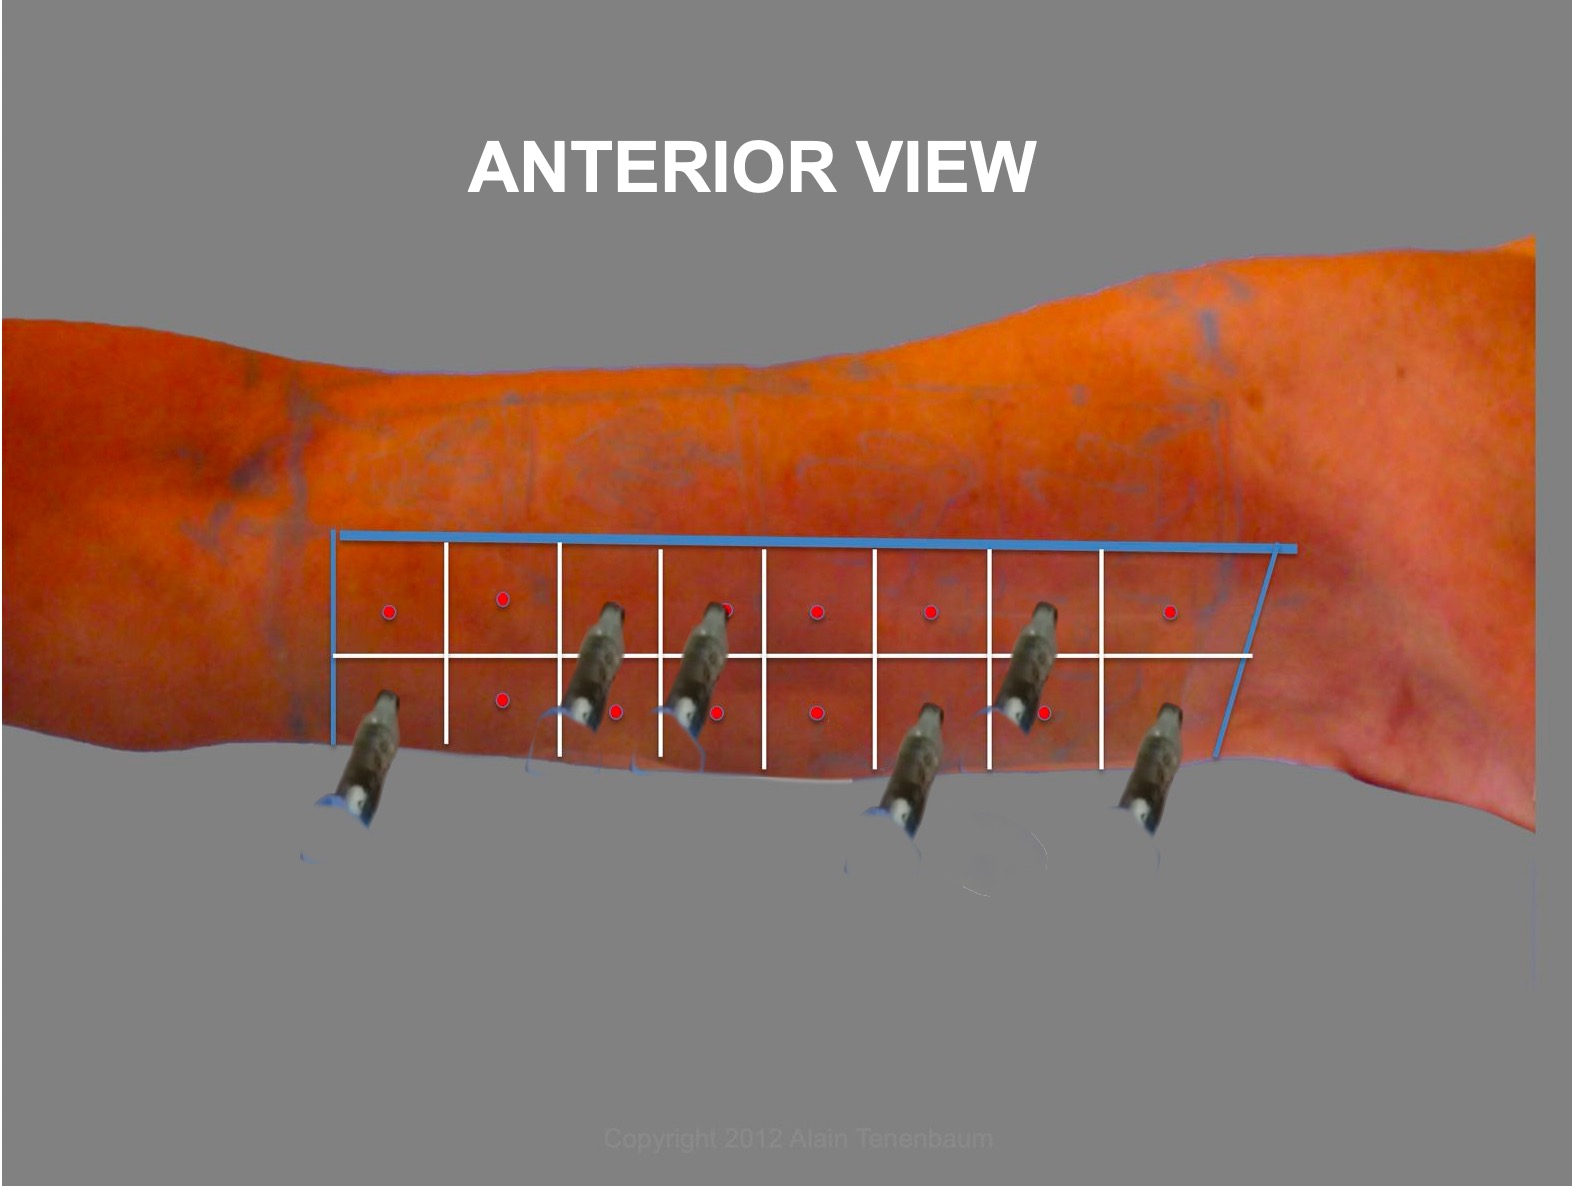
- The syringe has to be ,, normal,, or perpendicular in another plan with the center of each square.
- Inject 0.05ml if squares divisions have been made with 1 tongue depressor
- Inject 0.1 ml if squares divisions have been made with 2 tongue depressors
2-Injection of Tensors-Anterior View
- Position the syringe on the arrow ( tensor)
- The syringe has to be in full contact with the patients skin
- Dont put any finger under the syringe
- Begin the injection from the distal point of the arrow, pushing towards the proximal point of the arrow
- Inject 0.05ml if squares divisions have been made with 1 tongue depressor
- Inject 0.1 ml if squares divisions have been made with 2 tongue depressors
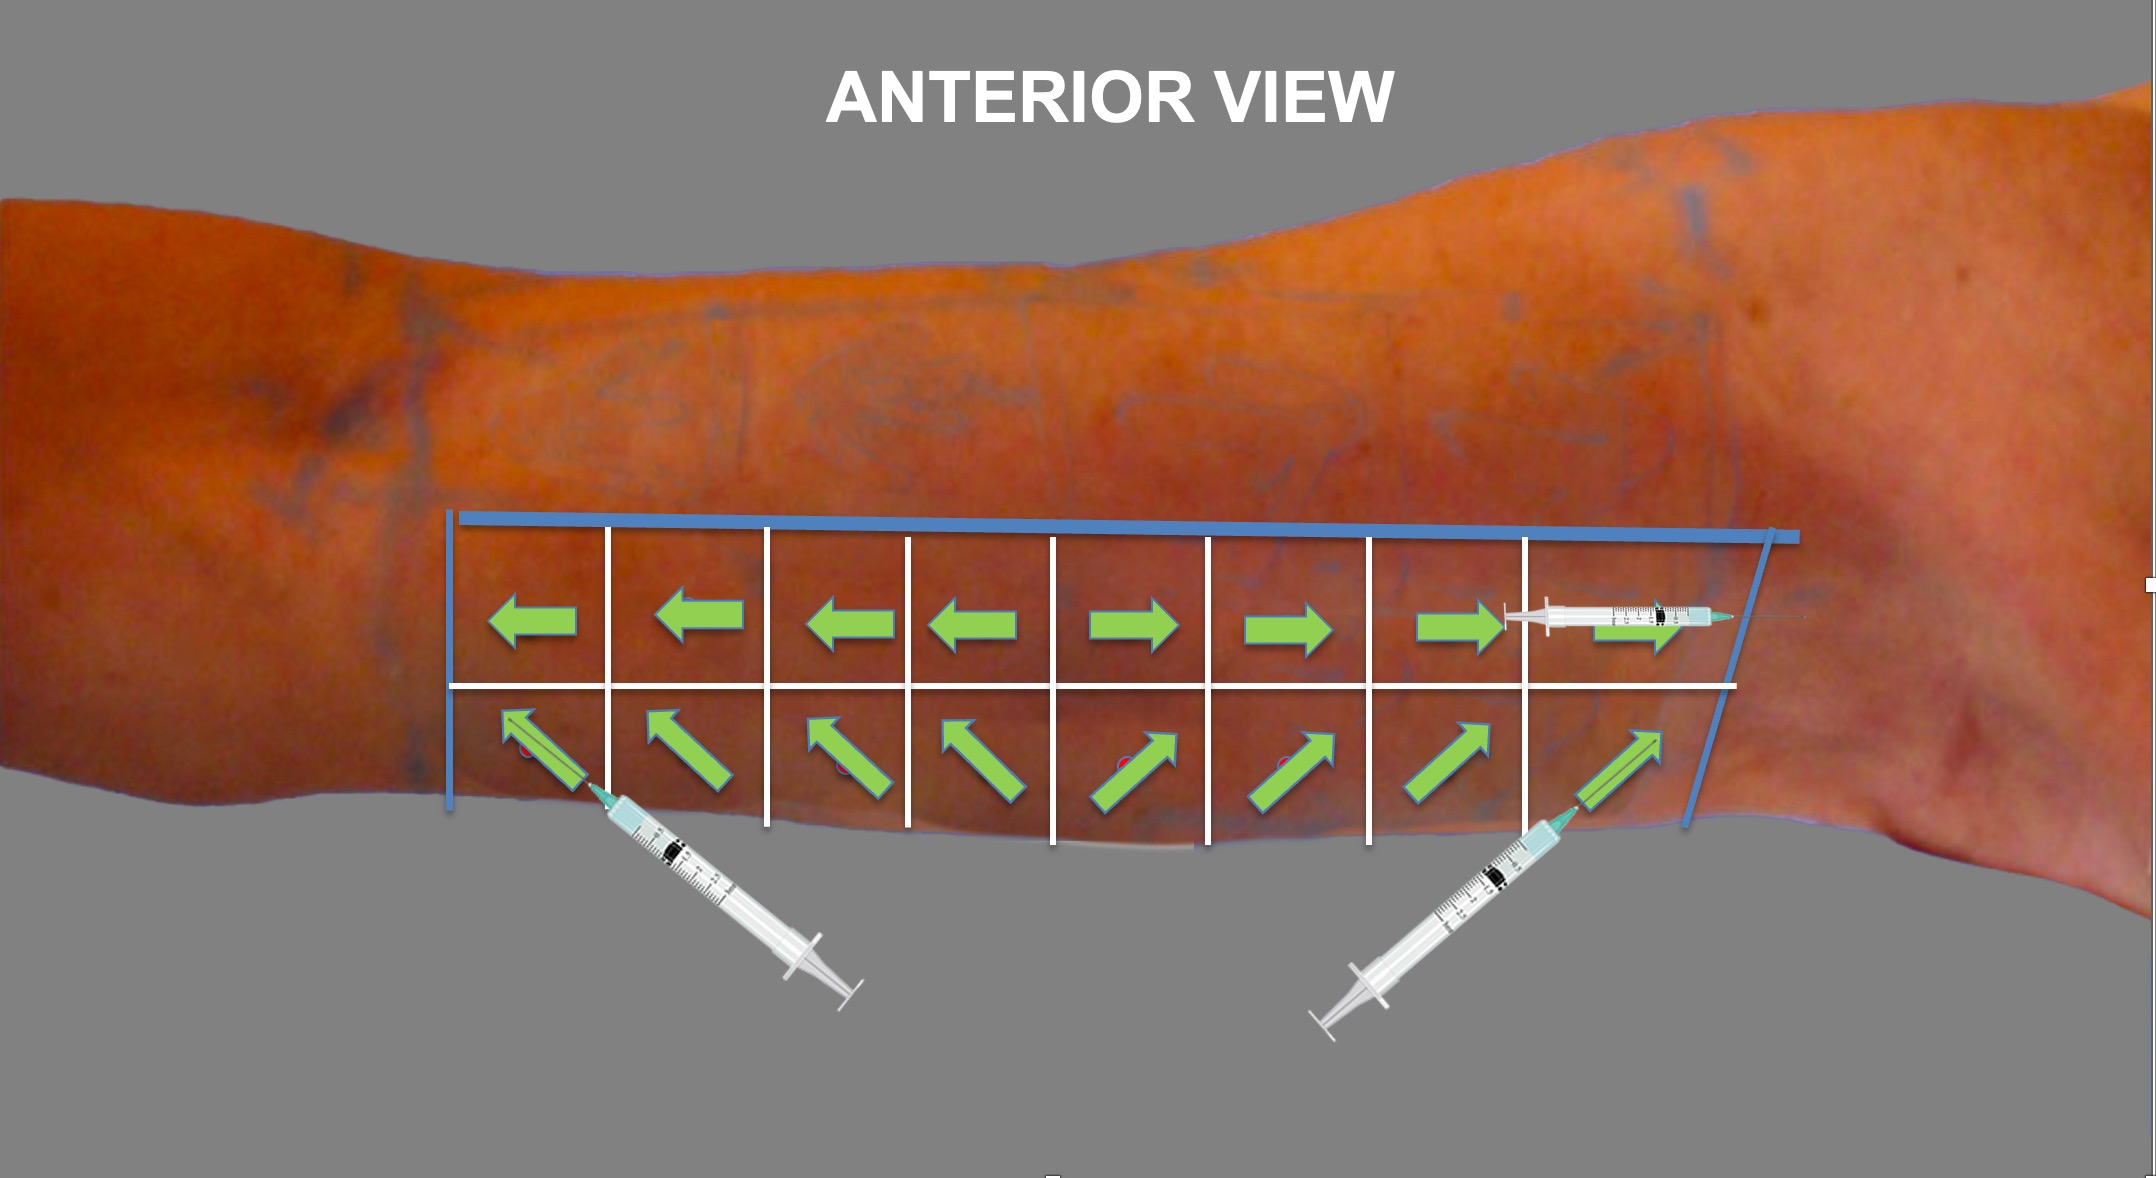
3-Injection of Vectors at the Lower Edge-Anterior View
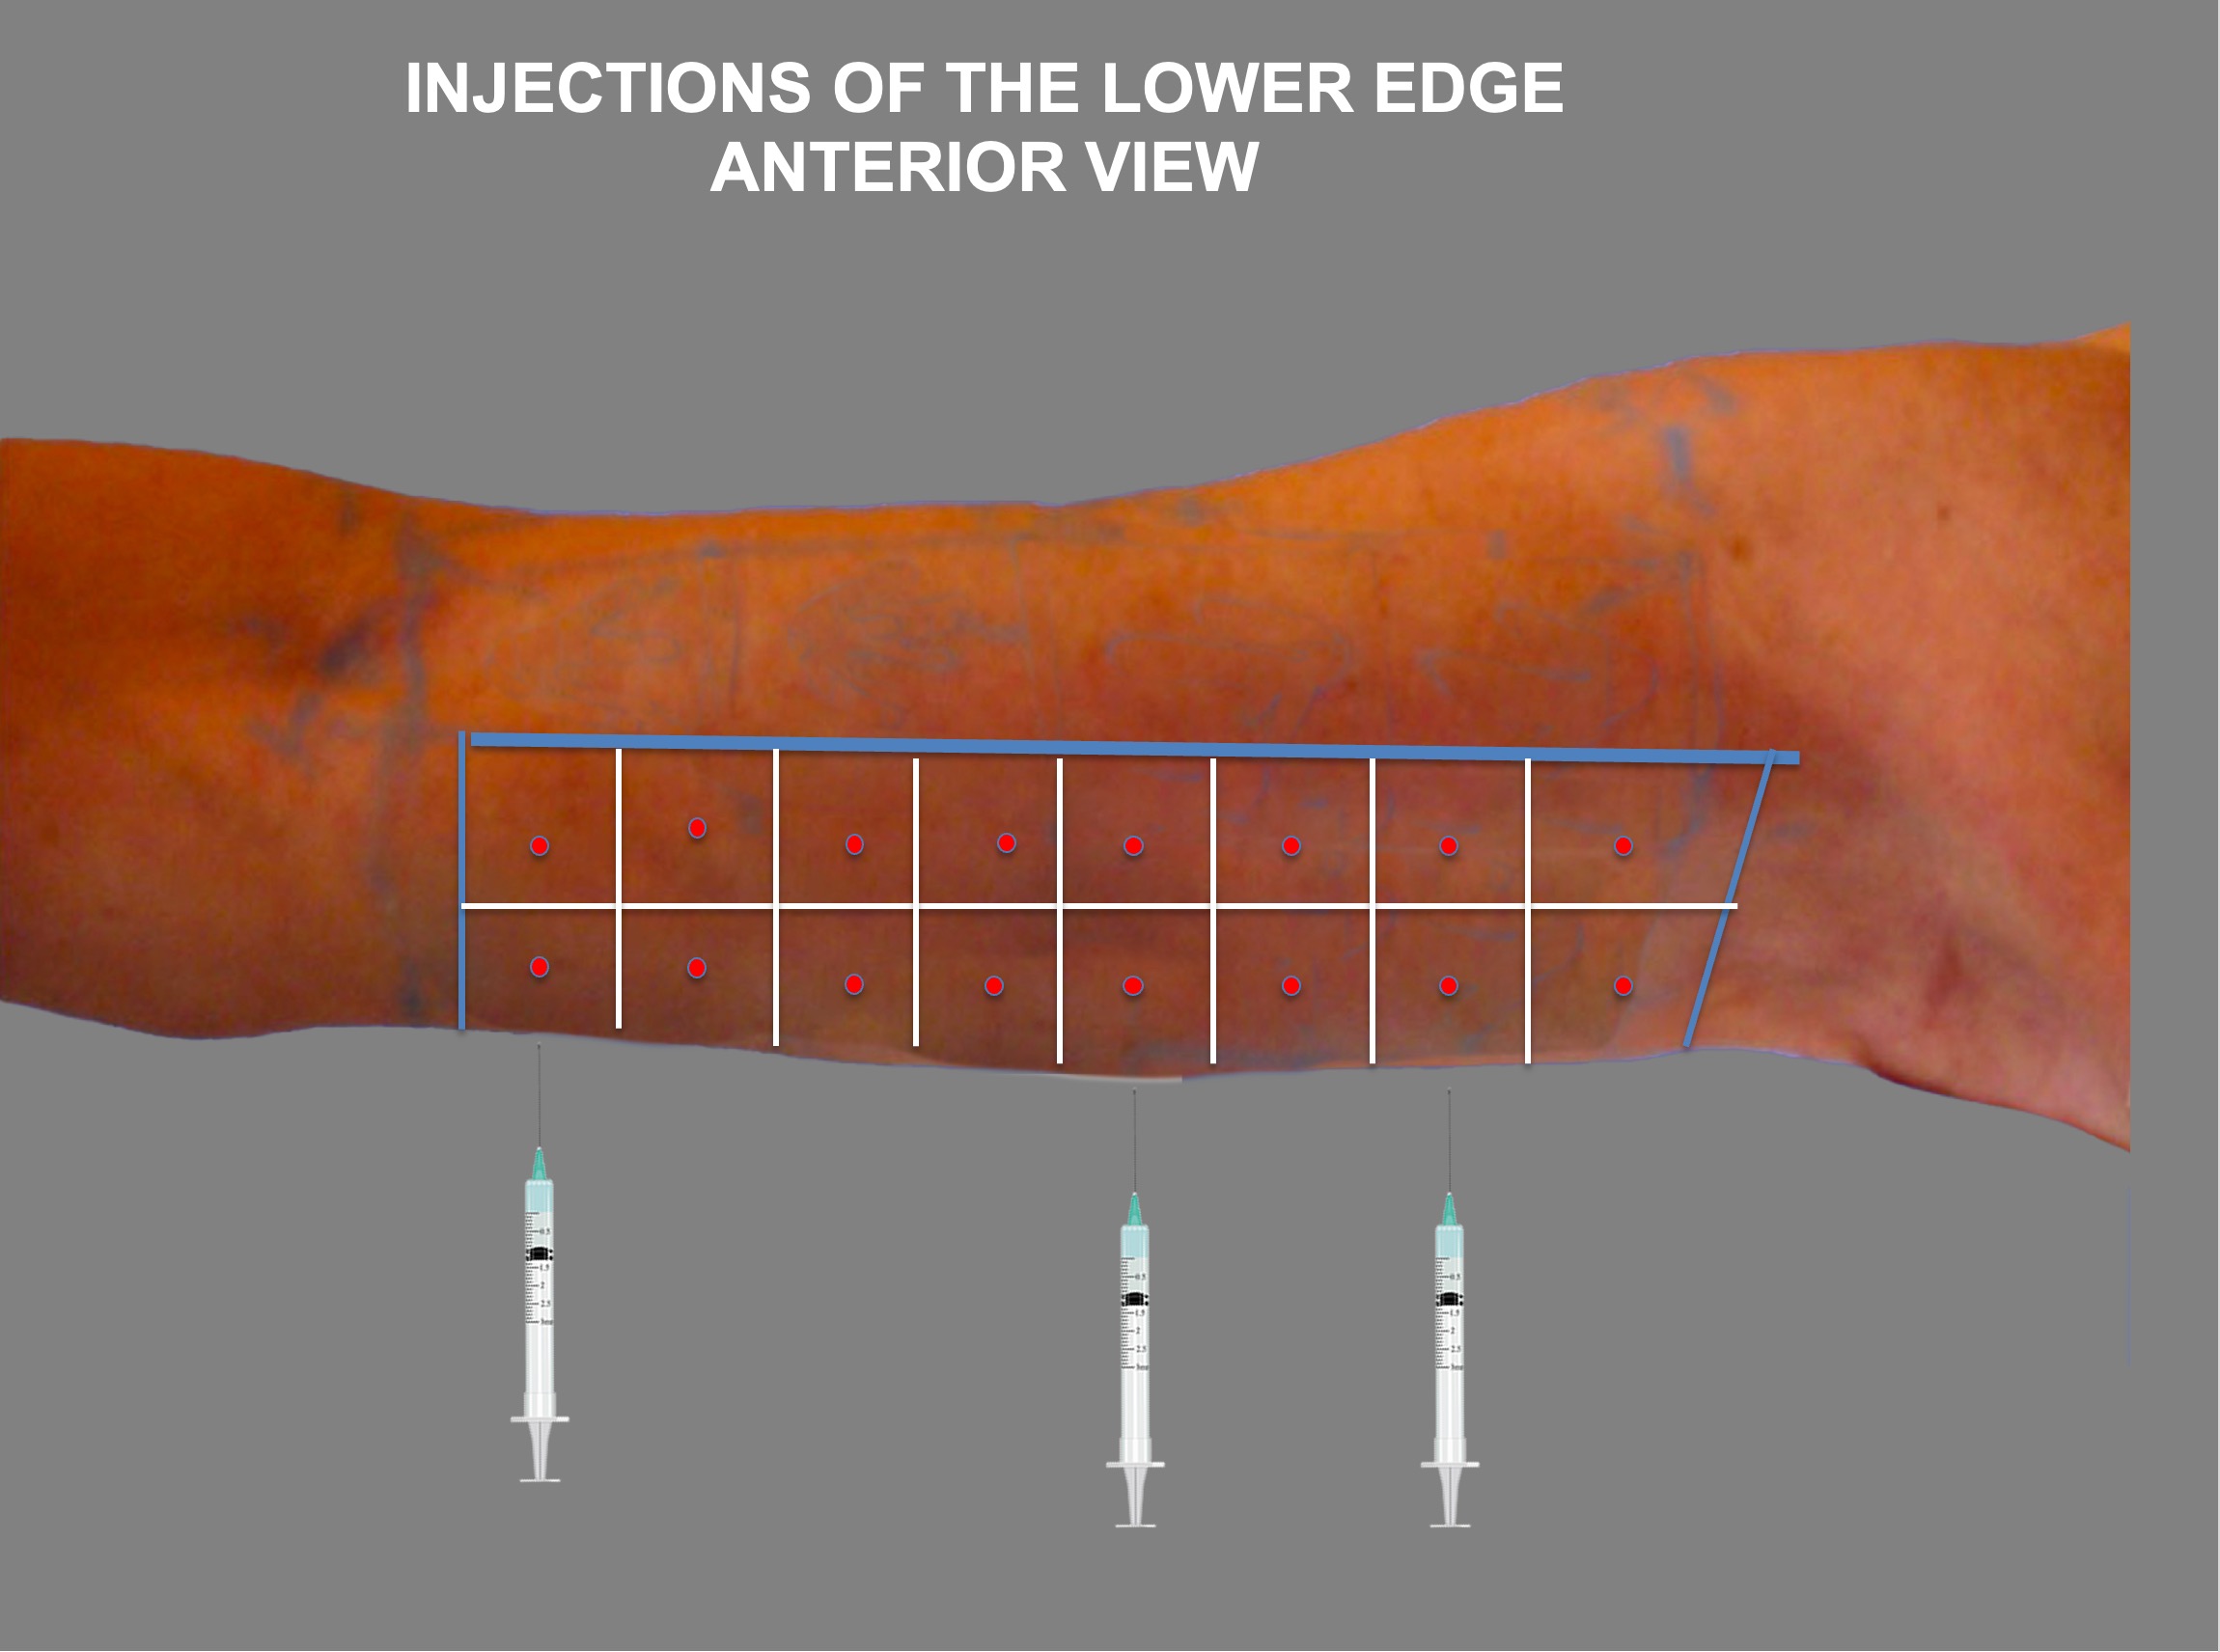
- The syringe has to be ,, normal,, or perpendicular in another plan towards the lower edge of the arm and push it vertically up.
- Inject 0.05ml if squares divisions have been made with 1 tongue depressor
- Inject 0.1 ml if squares divisions have been made with 2 tongue depressors
- Never look under the lower edge : stay always in front of the patient
- Injections have to be done, patient standing up
4-Injection of Vectors-Posterior View

- The syringe has to be ,, normal,, or perpendicular in another plan with the center of each square.
- Inject 0.05ml if squares divisions have been made with 1 tongue depressor
- Inject 0.1 ml if squares divisions have been made with 2 tongue depressors
5-Injection of Tensors-Posterior View
- Position the syringe on the arrow ( tensor)
- The syringe has to be in full contact with the patients skin
- Dont put any finger under the syringe
- Begin the injection from the distal point of the arrow, pushing towards the proximal point of the arrow
- Inject 0.05ml if squares divisions have been made with 1 tongue depressor
- Inject 0.1 ml if squares divisions have been made with 2 tongue depressors
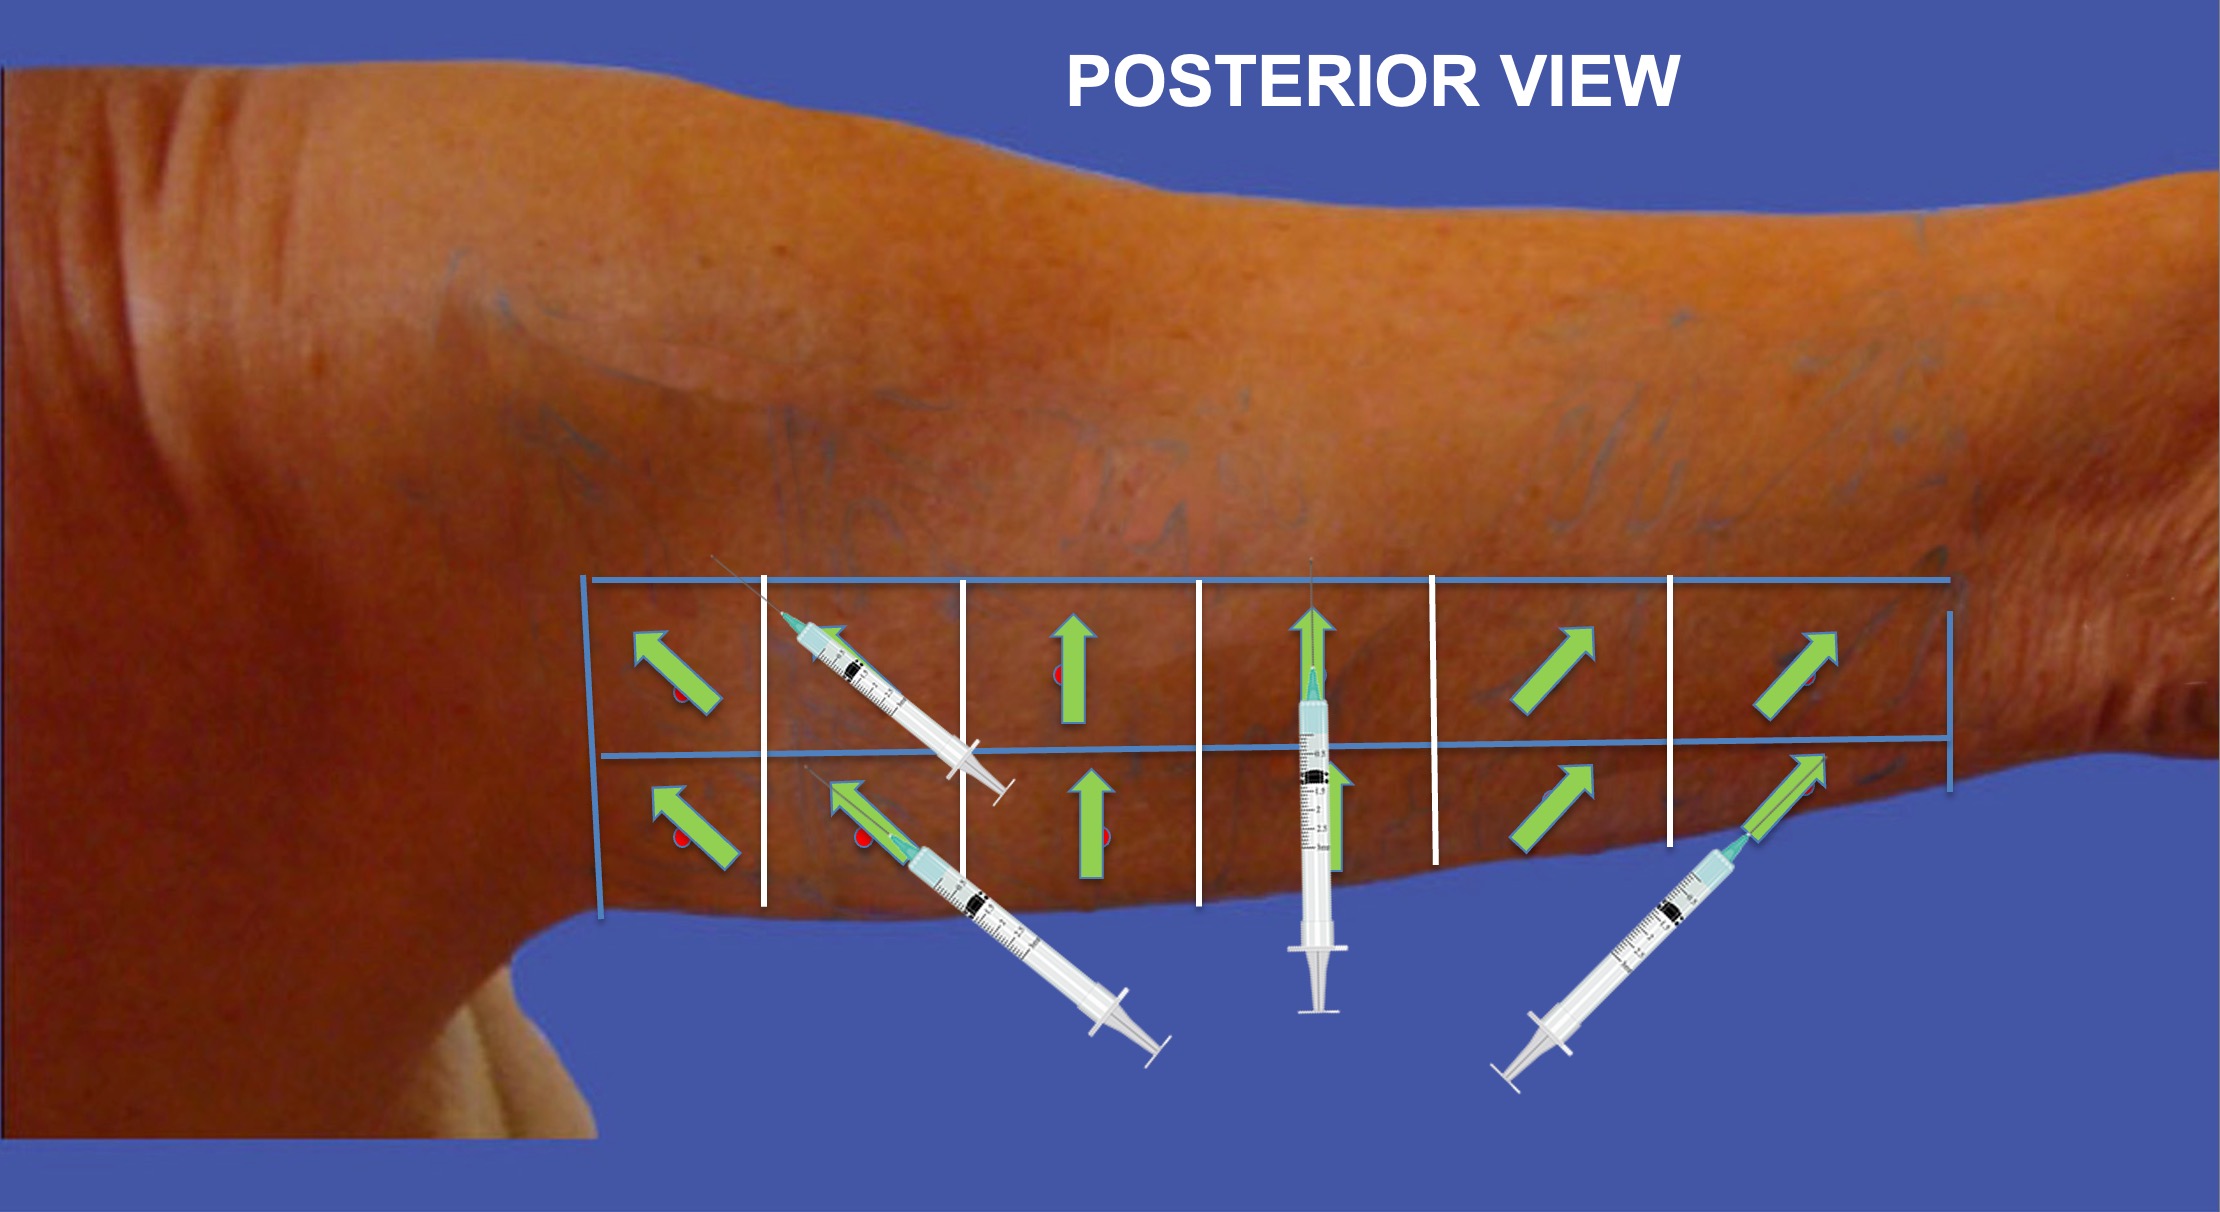
6-Injection of Vectors at the Lower Edge-Posterior View
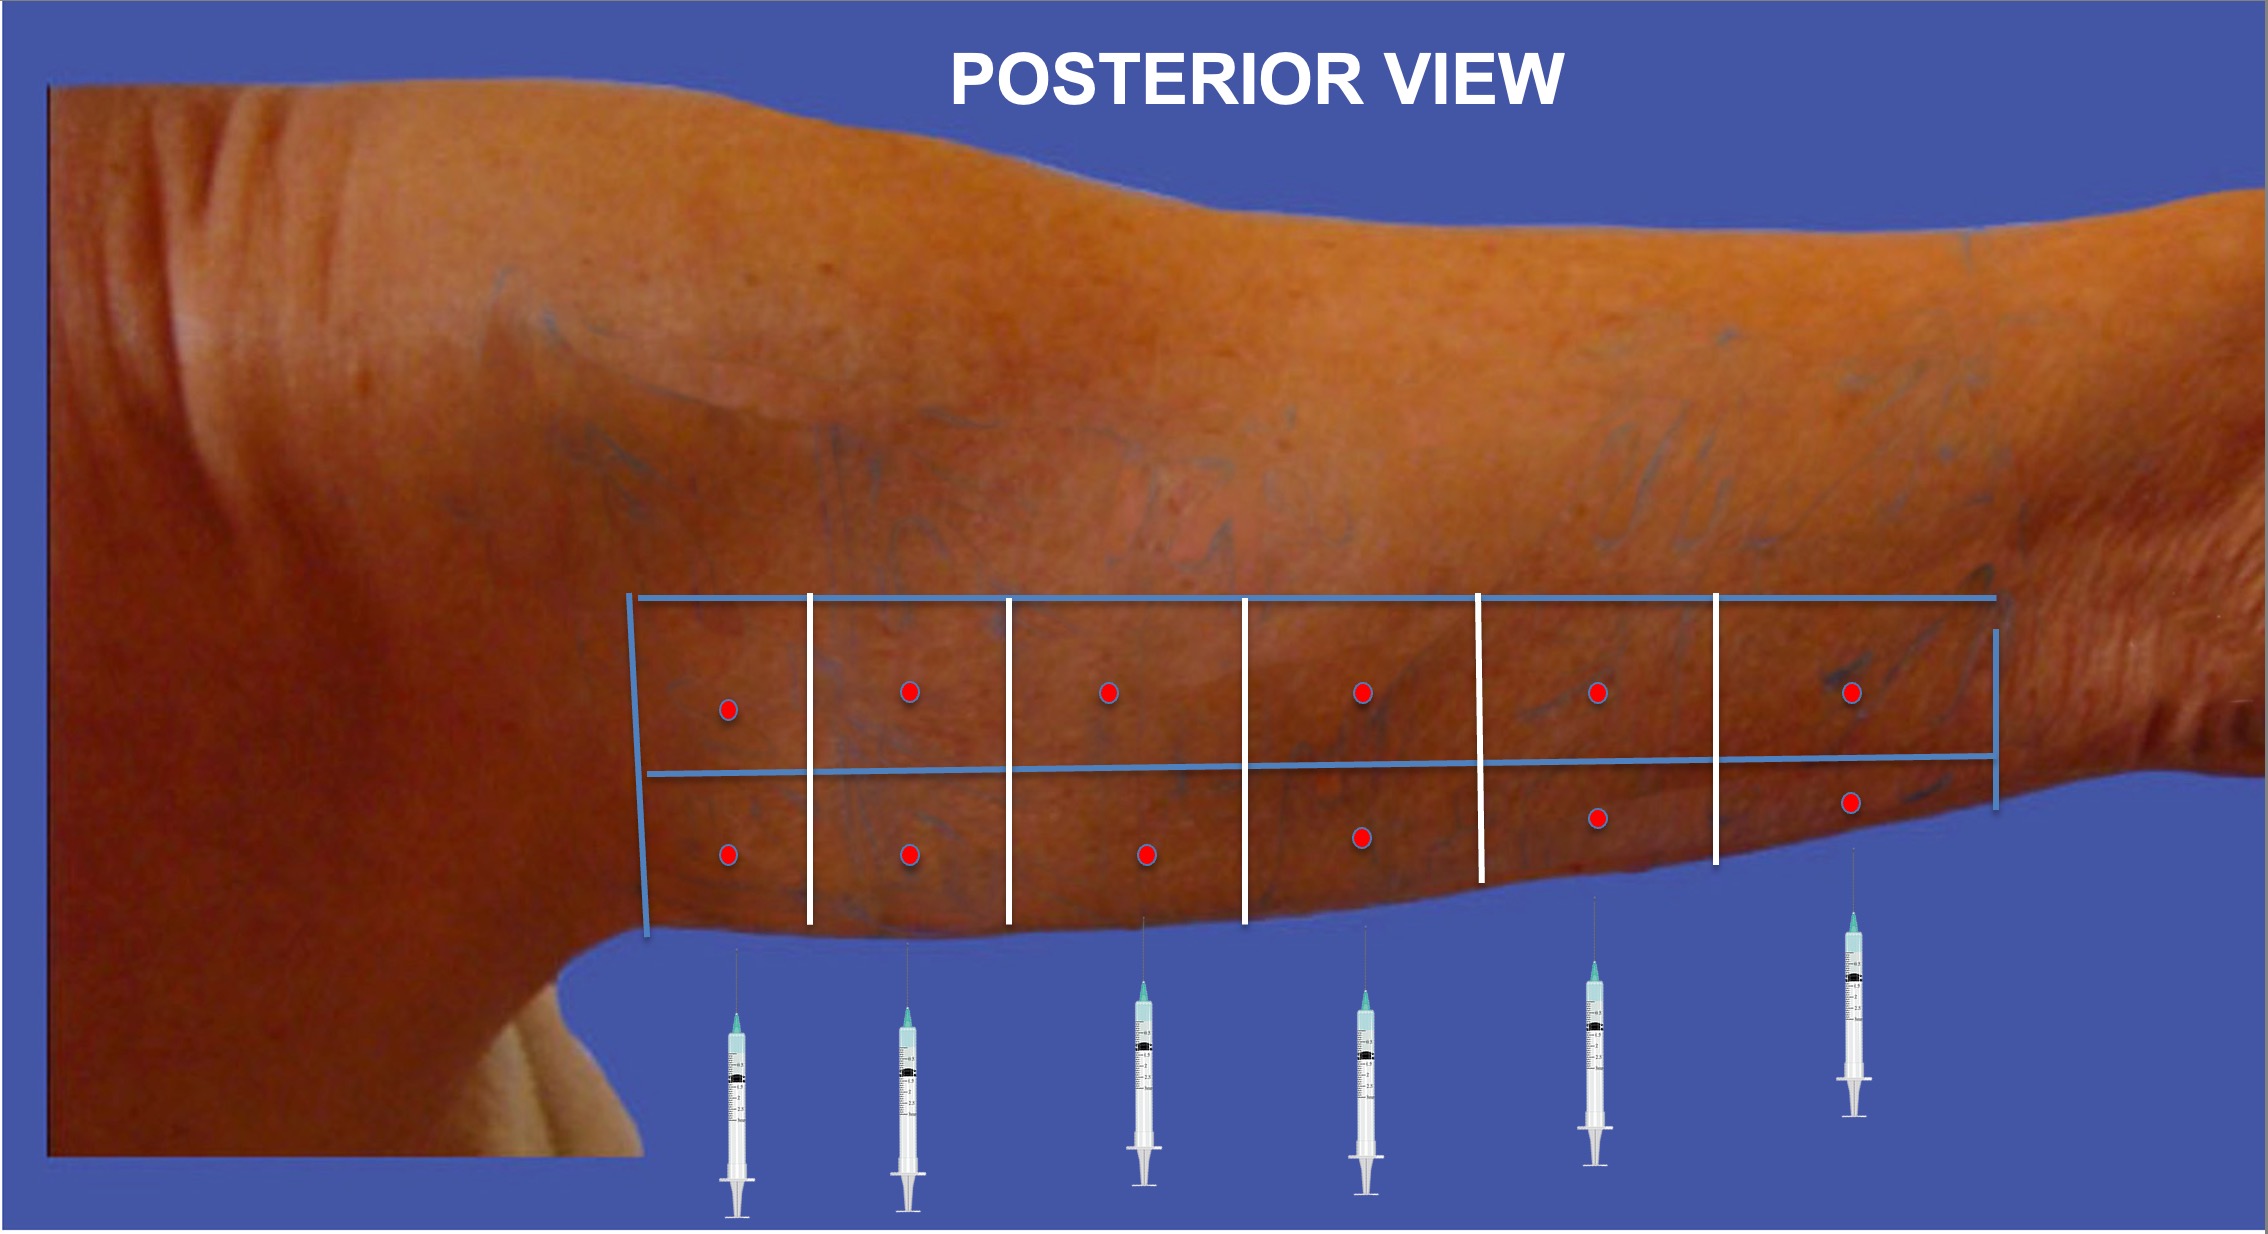
- The syringe has to be ,, normal,, or perpendicular in another plan towards the lower edge of the arm and push it vertically up.
- Inject 0.05ml if squares divisions have been made with 1 tongue depressor
- Inject 0.1 ml if squares divisions have been made with 2 tongue depressors
- Never look under the lower edge : stay always in front of the patient
- Injections have to be done, patient standing up
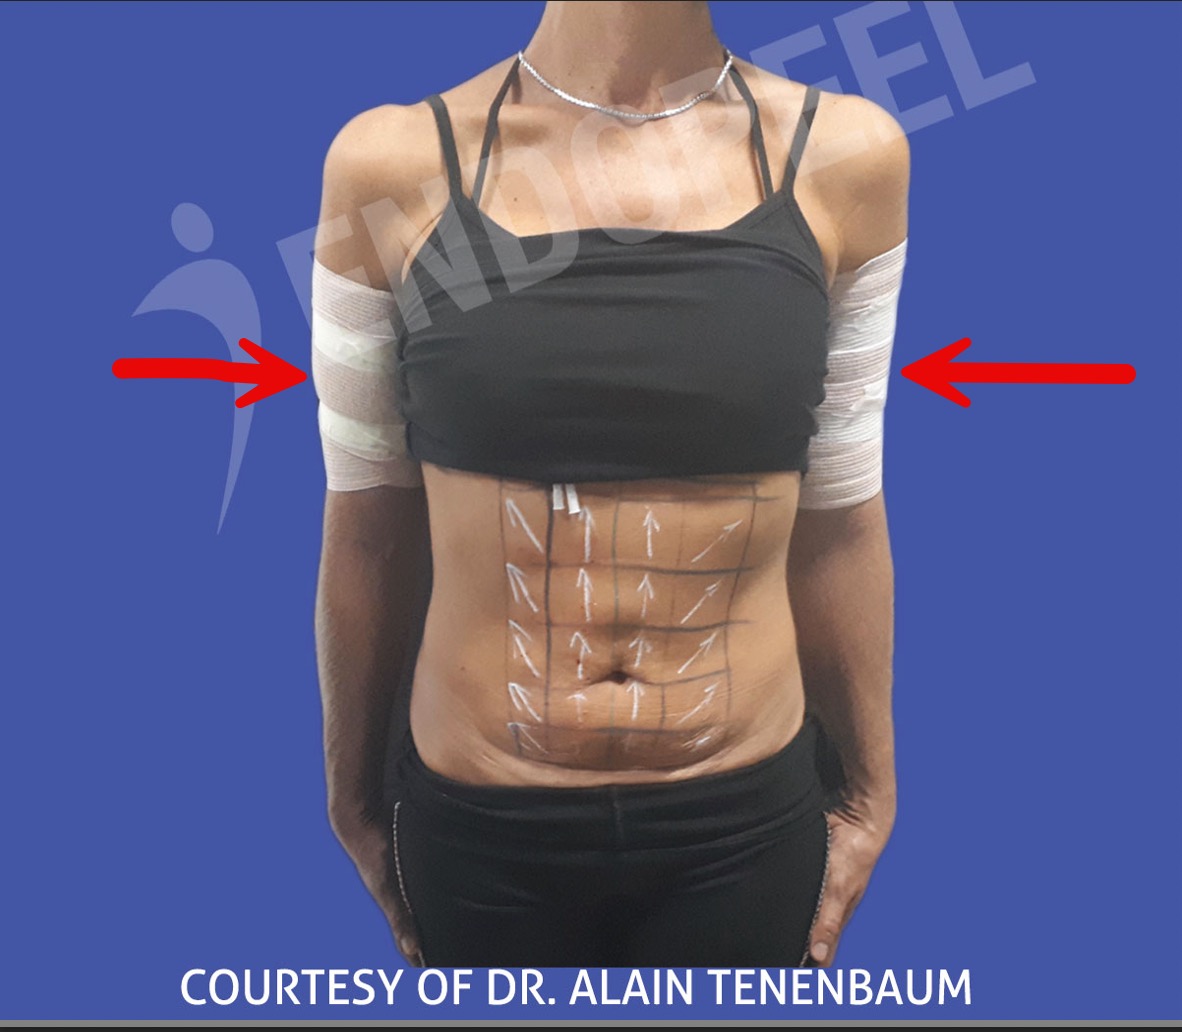
Step 10: Elastic Arm Bandage
- Use an elastic bandage for the arm
-
always check that the bandage is not too compressive and that the fingers are not purple. In such case, the bandage must be loosened.
- which has to be used for 3 consecutive days, to avoid any seroma as a dead space has been created .
- The patient can take a shower, remove the bandage and just after washing put it again.
Step 11 :
Conditions required before the patient leaves the medical office or the clinic
-
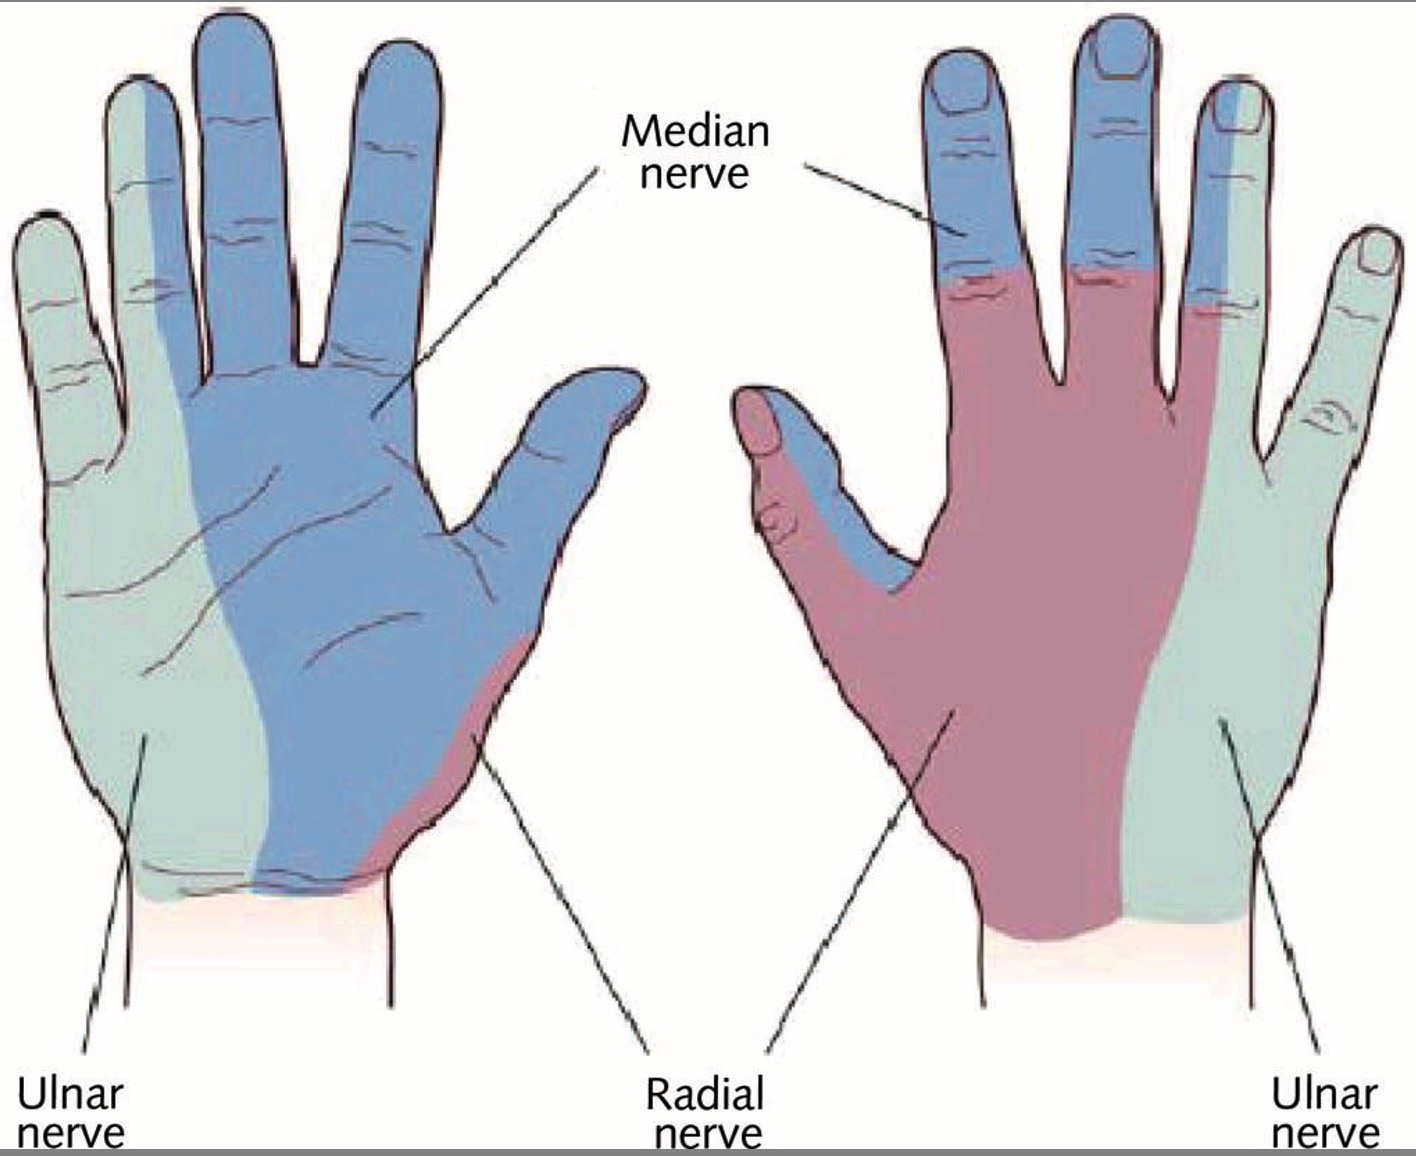
check the sensitivity of the fingers in the territory of the median and radial nerves.
-
in the event of hypoesthesia, have the patient wait 60 to 90 minutes in the waiting room before rechecking.
- have the patient sign that he has regained all his sensitivity.
- in the case of a patient trying to make money and in bad faith, take out the blowtorch and test the sensitivity of his fingers (Tenenbaum's infallible technique)
Not one case of hypoesthesia of the fingers has been reported worldwide since 24 years following endopeel techniques on the arms